Welcome to my cozy corner of the culinary world, where today, we’re diving into the delightful realm of Ruby Red Cherry Bars. These vibrant treats remind me of the bustling kitchens of my childhood in Asheville, where my grandmother taught me the magic of creating something delicious from scratch. Just like her cherished sopa de fideo, these cherry bars are an ode to simplicity and flavor, combining my love for family-inspired recipes with a twist of creativity. Join me as we explore this irresistibly sweet journey, perfect for novice and experienced bakers alike.
Table of Contents
Why You’ll Love This Ruby Red Cherry Bars
Ruby Red Cherry Bars are the perfect blend of nostalgia and modern flair. Growing up in a lively Mexican-American household, dessert was never just dessert — it was a celebration. These bars capture that spirit with their vibrant red hue and tart-sweet cherry flavor, reminiscent of the joyous chaos of family gatherings. Whether you’ve got a bustling household or a quiet evening alone, these bars bring warmth and a touch of festivity to any occasion. Plus, they’re incredibly easy to make, requiring just a handful of ingredients and minimal prep time, making them an ideal choice for busy weeknights or last-minute gatherings.
Ingredients You’ll Need for This Ruby Red Cherry Bars
- 1 cup unsalted butter, softened
- 1 1/2 cups granulated sugar
- 2 large eggs
- 1 teaspoon vanilla extract
- 2 1/4 cups all-purpose flour
- 1/2 teaspoon baking powder
- 1/4 teaspoon salt
- 1 1/2 cups cherry pie filling
- 1/2 cup chopped pecans (optional)
- Powdered sugar for dusting
Nutrition Facts
- Calories: 280 per serving
- Protein: 3g
- Fat: 14g
- Carbohydrates: 37g
- Fiber: 1g
- Sugar: 21g
- Sodium: 110mg

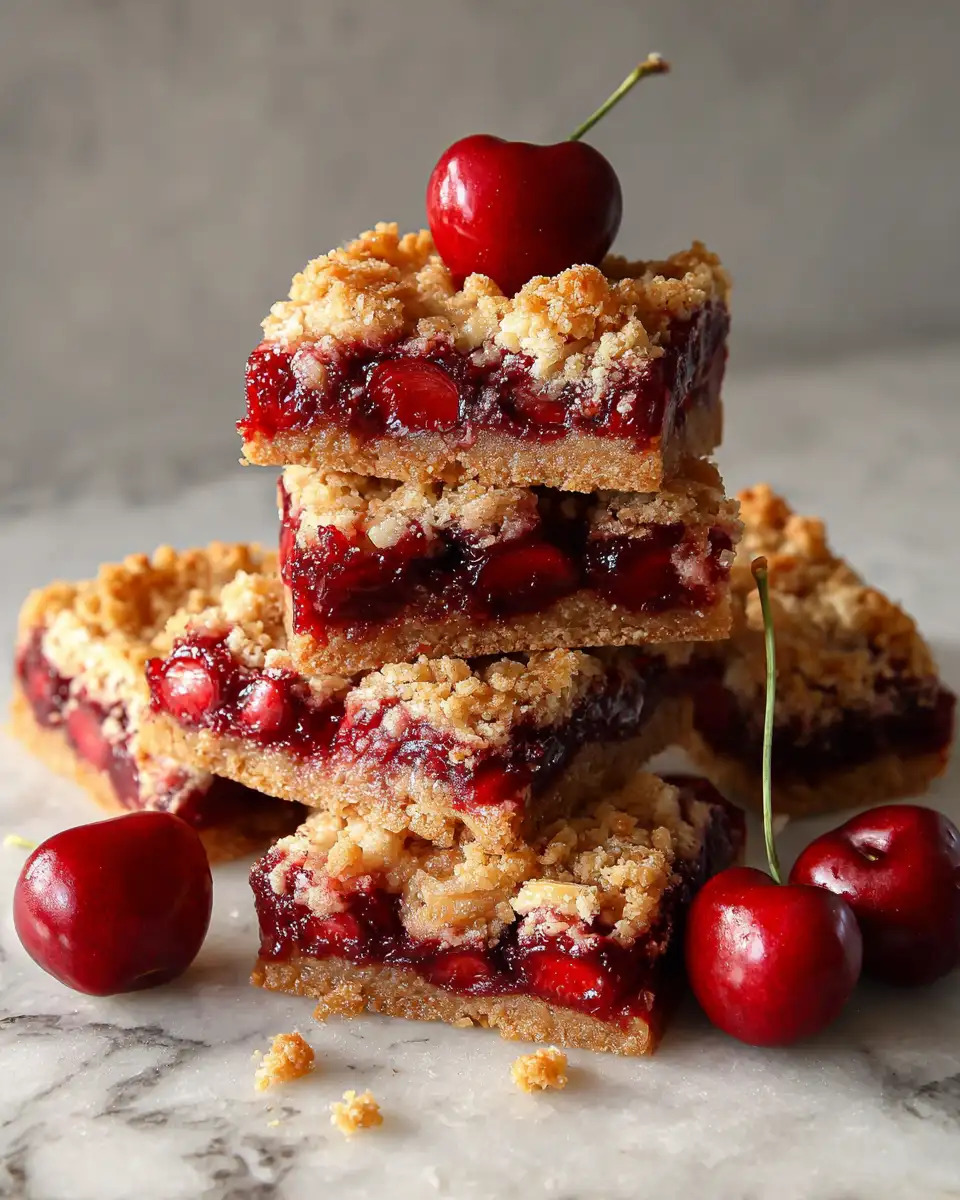
Irresistible Ruby Red Cherry Bars: A Sweet Slice of Bliss
Learn how to make delicious Ruby Red Cherry Bars. Easy recipe with step-by-step instructions.
- Total Time: 45 minutes
- Yield: 4 servings
Ingredients
- 1 cup unsalted butter, softened
- 1 1/2 cups granulated sugar
- 2 large eggs
- 1 teaspoon vanilla extract
- 2 1/4 cups all-purpose flour
- 1/2 teaspoon baking powder
- 1/4 teaspoon salt
- 1 1/2 cups cherry pie filling
- 1/2 cup chopped pecans (optional)
- Powdered sugar for dusting
Instructions
- Preheat your oven to 350°F (175°C) and grease a 9×13 inch baking pan with butter or non-stick spray.
- In a large bowl, cream together the softened butter and sugar until light and fluffy — about 3 minutes. This step always reminds me of baking cookies with my mom during the holidays, the kitchen filled with the sweet aroma of sugar and butter.
- Add the eggs one at a time, beating well after each addition. Stir in the vanilla extract, infusing the batter with a warm, comforting scent.
- In another bowl, whisk together the flour, baking powder, and salt. Gradually add the dry ingredients to the wet mixture, mixing just until combined. Be careful not to overmix, as my abuela always advised, to keep the bars tender.
- Spread about two-thirds of the batter evenly into the prepared pan. This layer serves as the foundation, much like the tortillas we used to roll out on the kitchen table for tacos.
- Evenly spoon the cherry pie filling over the batter. If you’re feeling adventurous, sprinkle some chopped pecans for an added crunch.
- Dollop the remaining batter over the cherry layer, allowing some of the cherry filling to peek through for a rustic look.
- Bake in the preheated oven for 30-35 minutes, or until the top is golden brown and a toothpick inserted into the center comes out clean.
- Let the bars cool completely in the pan. Dust with powdered sugar before serving, adding a touch of elegance to your creation.
- Prep Time: 15 minutes
- Cook Time: 30 minutes
- Category: Main Dish
- Method: Cooking
- Cuisine: International
Steps to Create Your Ruby Red Cherry Bars
- Preheat your oven to 350°F (175°C) and grease a 9×13 inch baking pan with butter or non-stick spray.
- In a large bowl, cream together the softened butter and sugar until light and fluffy — about 3 minutes. This step always reminds me of baking cookies with my mom during the holidays, the kitchen filled with the sweet aroma of sugar and butter.
- Add the eggs one at a time, beating well after each addition. Stir in the vanilla extract, infusing the batter with a warm, comforting scent.
- In another bowl, whisk together the flour, baking powder, and salt. Gradually add the dry ingredients to the wet mixture, mixing just until combined. Be careful not to overmix, as my abuela always advised, to keep the bars tender.
- Spread about two-thirds of the batter evenly into the prepared pan. This layer serves as the foundation, much like the tortillas we used to roll out on the kitchen table for tacos.
- Evenly spoon the cherry pie filling over the batter. If you’re feeling adventurous, sprinkle some chopped pecans for an added crunch.
- Dollop the remaining batter over the cherry layer, allowing some of the cherry filling to peek through for a rustic look.
- Bake in the preheated oven for 30-35 minutes, or until the top is golden brown and a toothpick inserted into the center comes out clean.
- Let the bars cool completely in the pan. Dust with powdered sugar before serving, adding a touch of elegance to your creation.
Tips for Making the Best Ruby Red Cherry Bars
To make these bars truly shine, use high-quality cherry pie filling or make your own if time permits. If cherries aren’t your jam (pun intended), feel free to substitute with any fruit filling of your choice. For an extra burst of flavor, try adding a teaspoon of almond extract to the batter, a trick I learned from experimenting with different flavor profiles in my kitchen. Remember, baking is as much about creativity as it is about precision, so don’t be afraid to make it your own!
Serving Suggestions and Pairings
These Ruby Red Cherry Bars are a versatile dessert, perfect for any occasion. Serve them warm with a scoop of vanilla ice cream for a delightful contrast between hot and cold, or pair them with a cup of coffee for a mid-afternoon treat. They also make a wonderful addition to a festive dessert table, sitting proudly alongside other family favorites like tres leches cake or flan. However you choose to serve them, these bars are sure to be a hit!
Storage and Reheating Tips
Store your Ruby Red Cherry Bars in an airtight container at room temperature for up to 3 days. If you prefer them warm, gently reheat individual bars in the microwave for about 10-15 seconds. For longer storage, these bars freeze beautifully. Wrap them individually in plastic wrap and place them in a freezer-safe bag. Simply thaw at room temperature when you’re ready to enjoy them again. These bars are like a sweet memory you can keep coming back to, much like the cherished recipes from my childhood.
Frequently Asked Questions
What are the main ingredients for Ruby Red Cherry Bars?
The main ingredients for Ruby Red Cherry Bars include the items listed in our ingredients section above. Each ingredient plays a crucial role in achieving the perfect flavor and texture.
How long does it take to make Ruby Red Cherry Bars?
The total time to make Ruby Red Cherry Bars includes both preparation and cooking time. Check the recipe card above for exact timing details.
Can I make Ruby Red Cherry Bars ahead of time?
Yes, Ruby Red Cherry Bars can often be prepared in advance. Store it properly in an airtight container in the refrigerator and consume within the recommended timeframe.
What can I serve with Ruby Red Cherry Bars?
Ruby Red Cherry Bars pairs well with various sides and accompaniments. Consider the serving suggestions mentioned in the recipe for the best dining experience.
Is Ruby Red Cherry Bars suitable for special diets?
Depending on the ingredients used, Ruby Red Cherry Bars may be adapted for various dietary needs. Check the ingredients list and consider substitutions as needed for your dietary requirements.
Final Thoughts
As we wrap up our culinary journey with these Ruby Red Cherry Bars, I hope you’ve found inspiration in the flavors and stories shared here today. CookingRecipesNow is all about bringing joy and creativity to your kitchen, and these bars are a testament to that mission. They’re more than just a sweet treat; they’re a celebration of home, family, and the rich traditions that have shaped my love for cooking. So, gather your ingredients, preheat the oven, and embark on this delightful baking adventure. Happy cooking!

")