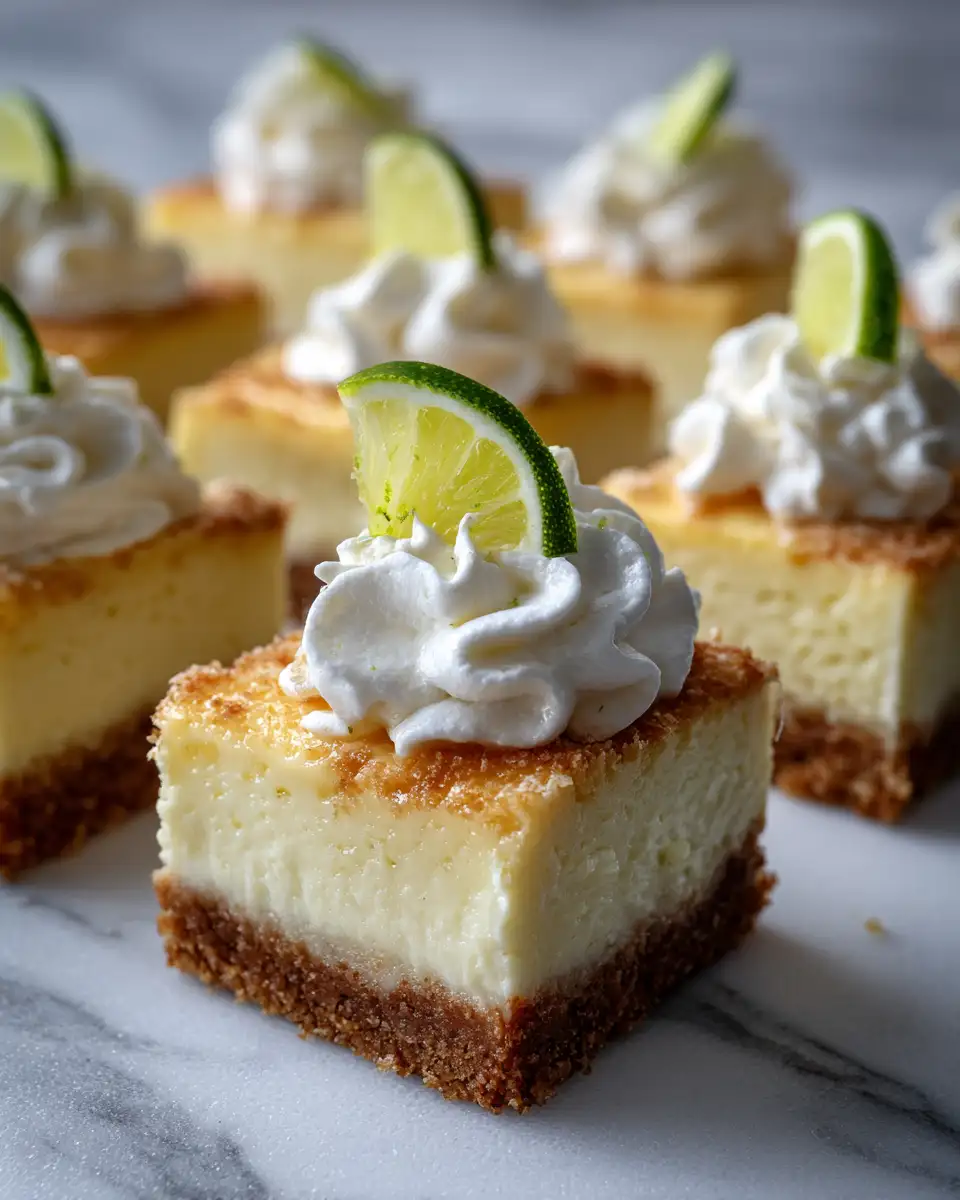
When it comes to desserts that are as refreshing as they are satisfying, Key Lime Pie Bars hold a special place in my heart. Growing up in a Mexican-American household, our desserts often took on the vibrant flavors my grandmother cherished, and these bars are no exception. They’ve become a staple in my Charleston kitchen, a delightful reminder of sunny days and cherished family gatherings. These bars are a culinary hug, combining the tartness of key lime with a sweet, buttery crust that’s simply irresistible. Whether you’re new to baking or a seasoned pro looking for a new favorite, these bars promise a slice of sunshine with every bite.
Table of Contents
Why You’ll Love This Key Lime Pie Bars
Key Lime Pie Bars are the perfect blend of sweet and tart, bringing together the classic flavors of a traditional Key Lime Pie with the convenience of a bar. These bars are a nod to childhood summers spent in the kitchen with my abuela, learning the art of balancing flavors. The simplicity of the recipe means you can whip them up quickly, making them ideal for unexpected guests or a last-minute treat. Plus, the portable nature of bars makes them perfect for picnics or potlucks, where they’re sure to be a hit. The bright citrus flavor offers a refreshing contrast to richer meals, making them a versatile dessert option for any occasion.
Ingredients You’ll Need for This Key Lime Pie Bars

- 1 1/2 cups graham cracker crumbs
- 1/4 cup granulated sugar
- 1/2 cup unsalted butter, melted
- 2 cans (14 ounces each) sweetened condensed milk
- 1/2 cup sour cream
- 3/4 cup key lime juice (freshly squeezed if possible)
- 1 tablespoon key lime zest
- 1 teaspoon vanilla extract
For those who might not have key limes on hand, regular lime juice can be a substitute. However, the key limes add a unique zest that’s hard to replicate! If you prefer a less sweet crust, consider reducing the sugar to taste.
Nutrition Facts
- Calories: 320 per serving
- Protein: 5g
- Fat: 15g
- Carbohydrates: 44g
- Fiber: 1g
- Sugar: 30g
- Sodium: 150mg
While these bars are an indulgent treat, they’re also a reminder that a little sweetness in life can be a good thing. The balance of flavors and textures means that a small piece goes a long way in satisfying your sweet cravings.
Print
Zesty Delight: Irresistible Key Lime Pie Bars You Need to Try
Learn how to make delicious Key Lime Pie Bars. Easy recipe with step-by-step instructions.
- Total Time: 45 minutes
- Yield: 4 servings
Ingredients
- 1 1/2 cups graham cracker crumbs
- 1/4 cup granulated sugar
- 1/2 cup unsalted butter, melted
- 2 cans (14 ounces each) sweetened condensed milk
- 1/2 cup sour cream
- 3/4 cup key lime juice (freshly squeezed if possible)
- 1 tablespoon key lime zest
- 1 teaspoon vanilla extract
For those who might not have key limes on hand, regular lime juice can be a substitute. However, the key limes add a unique zest that’s hard to replicate! If you prefer a less sweet crust, consider reducing the sugar to taste.
Instructions
- Preheat your oven to 350°F (175°C). Line a 9×13-inch baking dish with parchment paper for easy removal.
- In a medium bowl, combine the graham cracker crumbs, sugar, and melted butter. Mix until well combined and press evenly into the prepared baking dish to form the crust.
- Bake the crust for 10 minutes, then remove from the oven and let it cool slightly.
- In a large bowl, whisk together the sweetened condensed milk, sour cream, key lime juice, lime zest, and vanilla extract until smooth and well combined.
- Pour the lime filling over the pre-baked crust, spreading it evenly with a spatula.
- Bake for 15 minutes, or until the filling is set and slightly firm to the touch.
- Remove from the oven and allow the bars to cool to room temperature. Transfer them to the refrigerator and chill for at least 2 hours before slicing into squares.
- Serve chilled, and enjoy the burst of citrusy goodness!
Remember, cooking is all about engaging your senses. When you’re whisking the filling, take a moment to inhale the bright citrus scent—it’s sure to lift your spirits and remind you of sunny days. These small moments are what make cooking truly special.
- Prep Time: 15 minutes
- Cook Time: 30 minutes
- Category: Main Dish
- Method: Cooking
- Cuisine: International
Steps to Create Your Key Lime Pie Bars
- Preheat your oven to 350°F (175°C). Line a 9×13-inch baking dish with parchment paper for easy removal.
- In a medium bowl, combine the graham cracker crumbs, sugar, and melted butter. Mix until well combined and press evenly into the prepared baking dish to form the crust.
- Bake the crust for 10 minutes, then remove from the oven and let it cool slightly.
- In a large bowl, whisk together the sweetened condensed milk, sour cream, key lime juice, lime zest, and vanilla extract until smooth and well combined.
- Pour the lime filling over the pre-baked crust, spreading it evenly with a spatula.
- Bake for 15 minutes, or until the filling is set and slightly firm to the touch.
- Remove from the oven and allow the bars to cool to room temperature. Transfer them to the refrigerator and chill for at least 2 hours before slicing into squares.
- Serve chilled, and enjoy the burst of citrusy goodness!
Remember, cooking is all about engaging your senses. When you’re whisking the filling, take a moment to inhale the bright citrus scent—it’s sure to lift your spirits and remind you of sunny days. These small moments are what make cooking truly special.
Tips for Making the Best Key Lime Pie Bars
To achieve the perfect Key Lime Pie Bars, make sure your crust is packed firmly in the pan. This will ensure it holds together well when you cut the bars. If you’re using fresh key limes, zest them before juicing—this makes the process smoother and helps you capture all the vibrant flavor they have to offer. Lastly, don’t skip the chilling step. It’s essential for the bars to set properly and makes them easier to cut into neat squares.
Serving Suggestions and Pairings

Key Lime Pie Bars are perfect on their own, but if you’re looking to elevate the experience, consider serving them with a dollop of whipped cream or a scoop of vanilla ice cream. A sprinkle of lime zest on top adds a touch of elegance and extra flavor. These bars pair beautifully with a cup of hot coffee or a glass of iced tea, offering a delightful contrast to the dessert’s tartness.
Storage and Reheating Tips
Store any leftover Key Lime Pie Bars in an airtight container in the refrigerator for up to a week. If you’d like to enjoy them later, they can also be frozen. Simply wrap the bars individually in plastic wrap and place them in a freezer-safe container. To enjoy, allow them to thaw in the refrigerator overnight. While reheating isn’t necessary, if you prefer them slightly warmed, a few seconds in the microwave will do the trick.
Frequently Asked Questions
What are the main ingredients for Key Lime Pie Bars?
The main ingredients for Key Lime Pie Bars include the items listed in our ingredients section above. Each ingredient plays a crucial role in achieving the perfect flavor and texture.
How long does it take to make Key Lime Pie Bars?
The total time to make Key Lime Pie Bars includes both preparation and cooking time. Check the recipe card above for exact timing details.
Can I make Key Lime Pie Bars ahead of time?
Yes, Key Lime Pie Bars can often be prepared in advance. Store it properly in an airtight container in the refrigerator and consume within the recommended timeframe.
What can I serve with Key Lime Pie Bars?
Key Lime Pie Bars pairs well with various sides and accompaniments. Consider the serving suggestions mentioned in the recipe for the best dining experience.
Is Key Lime Pie Bars suitable for special diets?
Depending on the ingredients used, Key Lime Pie Bars may be adapted for various dietary needs. Check the ingredients list and consider substitutions as needed for your dietary requirements.
Final Thoughts
Creating these Key Lime Pie Bars is more than just making a dessert; it’s a way to connect with cherished memories and traditions. Each bite is a celebration of the flavors and stories that have shaped my culinary journey—from stirring pots alongside my abuela to discovering the joy of sharing recipes with others. So, whether you’re serving these at a family gathering or simply indulging in a quiet moment for yourself, I hope these bars bring a little sunshine and sweetness into your day. Happy cooking!

")