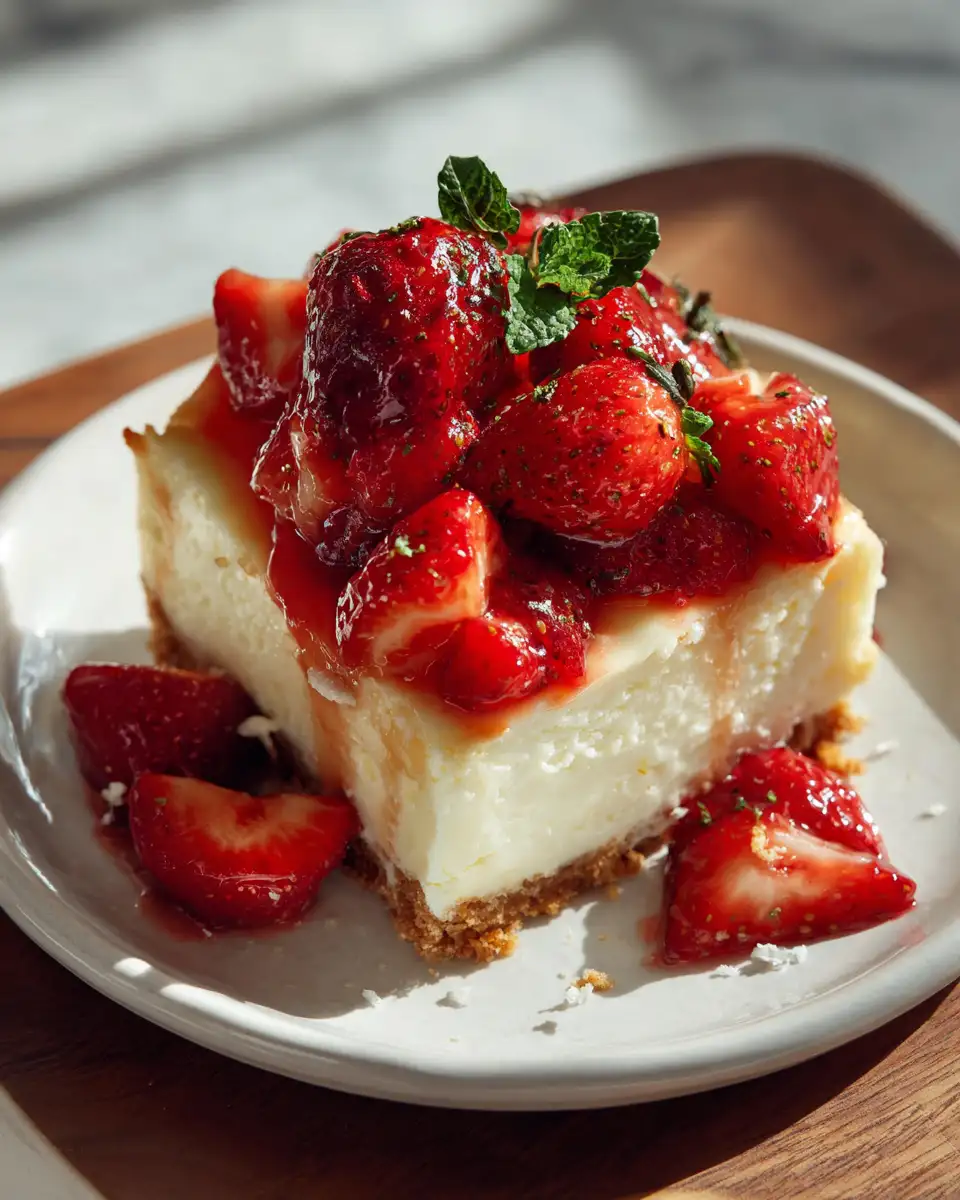
Welcome to another delightful creation from my kitchen to yours! If you’ve been searching for a sweet treat that combines elegance with ease, look no further than these Easy Cheesecake Deviled Strawberries. Growing up in a bustling Mexican-American household in Asheville, North Carolina, desserts were always a family affair, and I learned early on that the simplest ingredients often create the most memorable flavors. These strawberries remind me of those times, bringing together the joy of making something special with the people you love. Now, living in Charleston with my husband Marco and our golden retriever, Biscuit, I find joy in sharing these kinds of recipes that offer a little slice of happiness in every bite.
Table of Contents
Why You’ll Love This Easy Cheesecake Deviled Strawberries
These Easy Cheesecake Deviled Strawberries are a celebration of simplicity and flavor. They’re perfect for those moments when you want to impress guests without spending hours in the kitchen. The combination of fresh strawberries and creamy cheesecake filling is a match made in culinary heaven. Inspired by the vibrant and colorful meals of my childhood, this recipe captures the essence of a lively family gathering, filled with laughter and love. Whether you’re hosting a brunch, a casual get-together, or just treating yourself, these strawberries are sure to delight.
Ingredients You’ll Need for This Easy Cheesecake Deviled Strawberries

Here’s what you’ll need to whip up these delightful treats:
- 1 pound fresh strawberries
- 8 ounces cream cheese, softened
- 1/4 cup granulated sugar
- 1 teaspoon vanilla extract
- 1/4 cup graham cracker crumbs
- Optional: a pinch of cinnamon for an extra layer of warmth
Feel free to substitute the granulated sugar with honey or agave syrup for a natural sweetener. And if you’re feeling adventurous, a dash of lemon zest can add a refreshing twist.
Nutrition Facts
Here’s a glimpse into the nutritional profile of these delicious strawberries:
- Calories: 120 per serving
- Protein: 2g
- Fat: 7g
- Carbohydrates: 14g
- Fiber: 2g
- Sugar: 10g
- Sodium: 70mg

Sweet and Simple: Easy Cheesecake Deviled Strawberries Delight
Learn how to make delicious Easy Cheesecake Deviled Strawberries. Easy recipe with step-by-step instructions.
- Total Time: 45 minutes
- Yield: 4 servings
Ingredients
Here’s what you’ll need to whip up these delightful treats:
- 1 pound fresh strawberries
- 8 ounces cream cheese, softened
- 1/4 cup granulated sugar
- 1 teaspoon vanilla extract
- 1/4 cup graham cracker crumbs
- Optional: a pinch of cinnamon for an extra layer of warmth
Feel free to substitute the granulated sugar with honey or agave syrup for a natural sweetener. And if you’re feeling adventurous, a dash of lemon zest can add a refreshing twist.
Instructions
Let’s dive into the step-by-step process of creating these little bites of joy:
- Begin by washing the strawberries under cold water and patting them dry with a kitchen towel.
- Using a paring knife, hull the strawberries by removing the stems and carefully hollowing out the centers to create space for the filling.
- In a medium bowl, combine the softened cream cheese, granulated sugar, and vanilla extract. Beat the mixture until it’s smooth and creamy — a process that takes about 2-3 minutes.
- Transfer the cheesecake filling into a piping bag or a resealable plastic bag with a corner snipped off for easy filling.
- Pipe the cream cheese mixture into the hollowed-out strawberries, filling each one generously.
- Sprinkle the tops with graham cracker crumbs for a delightful crunch.
- For a touch of warmth, add a dash of cinnamon on top if desired.
- Chill the strawberries in the refrigerator for at least 30 minutes before serving — this allows the flavors to meld beautifully.
From my experience, chilling the strawberries enhances the cheesecake flavor, making each bite wonderfully refreshing.
- Prep Time: 15 minutes
- Cook Time: 30 minutes
- Category: Main Dish
- Method: Cooking
- Cuisine: International
Steps to Create Your Easy Cheesecake Deviled Strawberries
Let’s dive into the step-by-step process of creating these little bites of joy:
- Begin by washing the strawberries under cold water and patting them dry with a kitchen towel.
- Using a paring knife, hull the strawberries by removing the stems and carefully hollowing out the centers to create space for the filling.
- In a medium bowl, combine the softened cream cheese, granulated sugar, and vanilla extract. Beat the mixture until it’s smooth and creamy — a process that takes about 2-3 minutes.
- Transfer the cheesecake filling into a piping bag or a resealable plastic bag with a corner snipped off for easy filling.
- Pipe the cream cheese mixture into the hollowed-out strawberries, filling each one generously.
- Sprinkle the tops with graham cracker crumbs for a delightful crunch.
- For a touch of warmth, add a dash of cinnamon on top if desired.
- Chill the strawberries in the refrigerator for at least 30 minutes before serving — this allows the flavors to meld beautifully.
From my experience, chilling the strawberries enhances the cheesecake flavor, making each bite wonderfully refreshing.
Tips for Making the Best Easy Cheesecake Deviled Strawberries
Here are a few tips to ensure your strawberries are a hit:
- Choose ripe, firm strawberries for the best texture and flavor.
- If you don’t have a piping bag, a spoon works just fine for filling the strawberries.
- Prepare the filling ahead of time and store it in the fridge, so you can assemble the strawberries quickly when needed.
These tips have been honed over years of cooking with my abuela, where improvisation often led to delightful culinary surprises.
Serving Suggestions and Pairings

These strawberries are versatile and can be served in a variety of settings. For a brunch spread, pair them with a fresh fruit salad and a warm quiche. If you’re hosting a dinner party, they make a perfect light dessert alongside a cup of coffee or a glass of sparkling wine. The beauty of these strawberries is that they can stand alone or complement a wide array of dishes, much like the meals from my childhood that brought everyone together at the table.
Storage and Reheating Tips
To store these delectable treats, place them in an airtight container and refrigerate for up to two days. If you’re serving them at a later time, it’s best to add the graham cracker crumbs just before serving to maintain their crunch. While they don’t require reheating, serving them chilled enhances the cheesecake flavor, offering a refreshing finish to any meal.
Frequently Asked Questions
What are the main ingredients for Easy Cheesecake Deviled Strawberries?
The main ingredients for Easy Cheesecake Deviled Strawberries include the items listed in our ingredients section above. Each ingredient plays a crucial role in achieving the perfect flavor and texture.
How long does it take to make Easy Cheesecake Deviled Strawberries?
The total time to make Easy Cheesecake Deviled Strawberries includes both preparation and cooking time. Check the recipe card above for exact timing details.
Can I make Easy Cheesecake Deviled Strawberries ahead of time?
Yes, Easy Cheesecake Deviled Strawberries can often be prepared in advance. Store it properly in an airtight container in the refrigerator and consume within the recommended timeframe.
What can I serve with Easy Cheesecake Deviled Strawberries?
Easy Cheesecake Deviled Strawberries pairs well with various sides and accompaniments. Consider the serving suggestions mentioned in the recipe for the best dining experience.
Is Easy Cheesecake Deviled Strawberries suitable for special diets?
Depending on the ingredients used, Easy Cheesecake Deviled Strawberries may be adapted for various dietary needs. Check the ingredients list and consider substitutions as needed for your dietary requirements.
Final Thoughts
These Easy Cheesecake Deviled Strawberries are a testament to the joy of simple cooking. They bring together the spirit of family, the delight of fresh ingredients, and the satisfaction of creating something beautiful. I hope this recipe inspires you to gather with loved ones, create cherished memories, and enjoy the art of home cooking. Remember, every dish is an opportunity to share a piece of your heart, just like the meals I learned to make in my grandmother’s kitchen. Happy cooking!


")