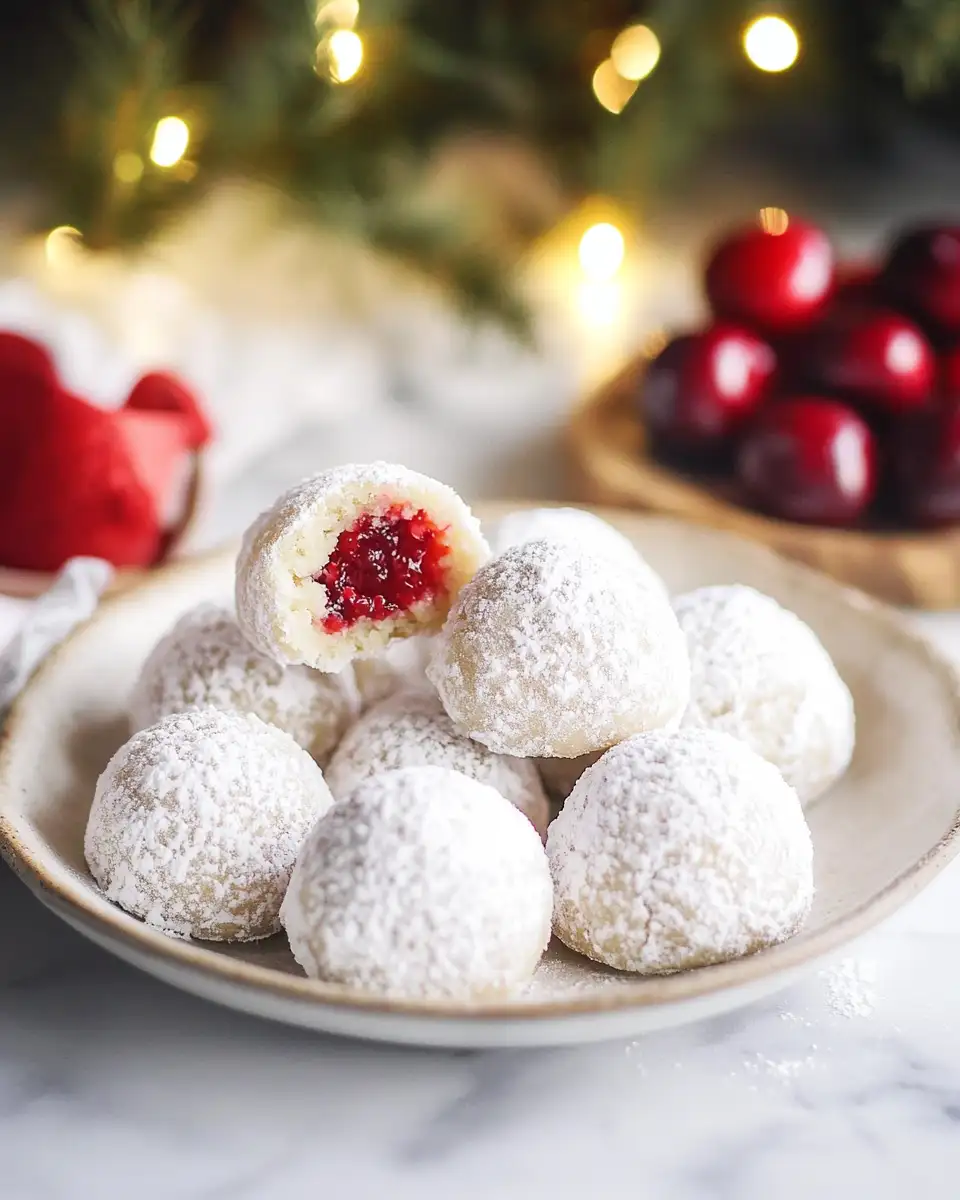
Imagine biting into a delicate, powdery treat that’s both sweet and slightly tangy—enter Cherry Snowball Cookies. These delightful morsels are a staple in my home, where the aroma of baking often mingles with memories of my grandmother’s bustling kitchen. My love for these cookies started when I was young, with my abuela, who taught me that a recipe is more than just a list of ingredients; it’s a story, a tradition, and a way to connect with loved ones. Now, as I share this recipe with you, I hope to bring a touch of that warmth and nostalgia into your home.
Table of Contents
Why You’ll Love This Cherry Snowball Cookies
Cherry Snowball Cookies are the perfect fusion of simplicity and flavor, making them a must-try for both novice bakers and seasoned pros. These cookies have a tender, buttery texture that melts in your mouth, balanced by the subtle tartness of maraschino cherries. Growing up in a Mexican-American household, I learned to appreciate bold flavors and vibrant colors in food, and these cookies deliver just that. They’re not only visually appealing but also a breeze to make, with a short prep time and a handful of ingredients. Whether you’re baking for a festive occasion or simply indulging your sweet tooth on a quiet afternoon, these cookies are sure to delight.
Ingredients You’ll Need for This Cherry Snowball Cookies

- 1 cup unsalted butter, softened
- 1/2 cup powdered sugar
- 1 teaspoon vanilla extract
- 2 cups all-purpose flour
- 1/4 teaspoon salt
- 1/2 cup maraschino cherries, drained and chopped
- 1 cup finely chopped pecans or walnuts (optional)
- Additional powdered sugar for rolling
When I was little, my grandmother often added nuts to our cookies for a bit of crunch, but feel free to leave them out if you prefer a smoother texture. The maraschino cherries are the star here, providing that pop of color and flavor that makes these cookies stand out.
Nutrition Facts
- Calories: 150 per cookie
- Protein: 1g
- Fat: 9g
- Carbohydrates: 17g
- Fiber: 0.5g
- Sugar: 8g
- Sodium: 20mg
These cookies are a treat, but with just the right balance of fat and carbohydrates, they make for an indulgent yet reasonable snack. Remember, moderation is key, and these cookies are perfect for sharing!
Print
Sweet Bliss in Every Bite Cherry Snowball Cookies Delight
Learn how to make delicious Cherry Snowball Cookies. Easy recipe with step-by-step instructions.
- Total Time: 45 minutes
- Yield: 4 servings
Ingredients
- 1 cup unsalted butter, softened
- 1/2 cup powdered sugar
- 1 teaspoon vanilla extract
- 2 cups all-purpose flour
- 1/4 teaspoon salt
- 1/2 cup maraschino cherries, drained and chopped
- 1 cup finely chopped pecans or walnuts (optional)
- Additional powdered sugar for rolling
When I was little, my grandmother often added nuts to our cookies for a bit of crunch, but feel free to leave them out if you prefer a smoother texture. The maraschino cherries are the star here, providing that pop of color and flavor that makes these cookies stand out.
Instructions
- Preheat your oven to 325°F and line a baking sheet with parchment paper.
- In a large mixing bowl, cream together the softened butter and 1/2 cup powdered sugar until light and fluffy, about 3-4 minutes. My abuela always said that well-creamed butter is the secret to a tender cookie.
- Add in the vanilla extract, mixing until fully incorporated.
- Gradually mix in the flour and salt until the dough starts to come together. Be careful not to overmix, as this can make the cookies tough.
- Gently fold in the chopped cherries and nuts (if using) until evenly distributed throughout the dough.
- Roll the dough into 1-inch balls and place them on the prepared baking sheet, spacing them about 1 inch apart.
- Bake for 15-18 minutes, or until the bottoms are lightly golden. The tops should remain pale.
- Allow the cookies to cool slightly, then roll them in additional powdered sugar while still warm. This creates the iconic “snowball” effect.
These steps are straightforward, making the recipe perfect for baking with kids or sharing with friends. My husband Marco often joins me in the kitchen when I bake these, sneaking a taste of the dough when he thinks I’m not looking!
- Prep Time: 15 minutes
- Cook Time: 30 minutes
- Category: Main Dish
- Method: Cooking
- Cuisine: International
Steps to Create Your Cherry Snowball Cookies
- Preheat your oven to 325°F and line a baking sheet with parchment paper.
- In a large mixing bowl, cream together the softened butter and 1/2 cup powdered sugar until light and fluffy, about 3-4 minutes. My abuela always said that well-creamed butter is the secret to a tender cookie.
- Add in the vanilla extract, mixing until fully incorporated.
- Gradually mix in the flour and salt until the dough starts to come together. Be careful not to overmix, as this can make the cookies tough.
- Gently fold in the chopped cherries and nuts (if using) until evenly distributed throughout the dough.
- Roll the dough into 1-inch balls and place them on the prepared baking sheet, spacing them about 1 inch apart.
- Bake for 15-18 minutes, or until the bottoms are lightly golden. The tops should remain pale.
- Allow the cookies to cool slightly, then roll them in additional powdered sugar while still warm. This creates the iconic “snowball” effect.
These steps are straightforward, making the recipe perfect for baking with kids or sharing with friends. My husband Marco often joins me in the kitchen when I bake these, sneaking a taste of the dough when he thinks I’m not looking!
Tips for Making the Best Cherry Snowball Cookies
To ensure your Cherry Snowball Cookies are perfect every time, here are a few tips from my kitchen to yours:
- Chill the Dough: If your dough feels too sticky, chill it for 30 minutes before rolling. This helps it firm up, making it easier to handle.
- Use Quality Butter: The flavor of your cookies largely depends on the butter, so choose a high-quality unsalted butter for the best results.
- Don’t Overbake: Keep a close eye on the cookies in the oven. They should be set but not browned on top, ensuring that melt-in-your-mouth texture.
Serving Suggestions and Pairings

Cherry Snowball Cookies are wonderfully versatile and can be enjoyed in various settings. Serve them at holiday gatherings with a cup of hot cocoa, or pair them with a refreshing glass of milk for a simple afternoon snack. They also make excellent gifts; just wrap them in a decorative tin or box, and you’ll have a homemade treat that’s sure to impress.
Storage and Reheating Tips
These cookies keep well and can be stored in an airtight container at room temperature for up to a week. If you’d like to make them ahead of time, the dough can be frozen for up to three months. Simply thaw in the refrigerator before baking. To refresh the cookies, give them a quick roll in additional powdered sugar before serving.
Frequently Asked Questions
What are the main ingredients for Cherry Snowball Cookies?
The main ingredients for Cherry Snowball Cookies include the items listed in our ingredients section above. Each ingredient plays a crucial role in achieving the perfect flavor and texture.
How long does it take to make Cherry Snowball Cookies?
The total time to make Cherry Snowball Cookies includes both preparation and cooking time. Check the recipe card above for exact timing details.
Can I make Cherry Snowball Cookies ahead of time?
Yes, Cherry Snowball Cookies can often be prepared in advance. Store it properly in an airtight container in the refrigerator and consume within the recommended timeframe.
What can I serve with Cherry Snowball Cookies?
Cherry Snowball Cookies pairs well with various sides and accompaniments. Consider the serving suggestions mentioned in the recipe for the best dining experience.
Is Cherry Snowball Cookies suitable for special diets?
Depending on the ingredients used, Cherry Snowball Cookies may be adapted for various dietary needs. Check the ingredients list and consider substitutions as needed for your dietary requirements.
Final Thoughts
Cherry Snowball Cookies are more than just a sweet treat; they’re a testament to the joy of home baking and the memories we create in the kitchen. Whether you’re making these for the first time or the hundredth, I hope you find the same happiness in sharing them with your loved ones as I do. From my kitchen to yours, happy baking!

")