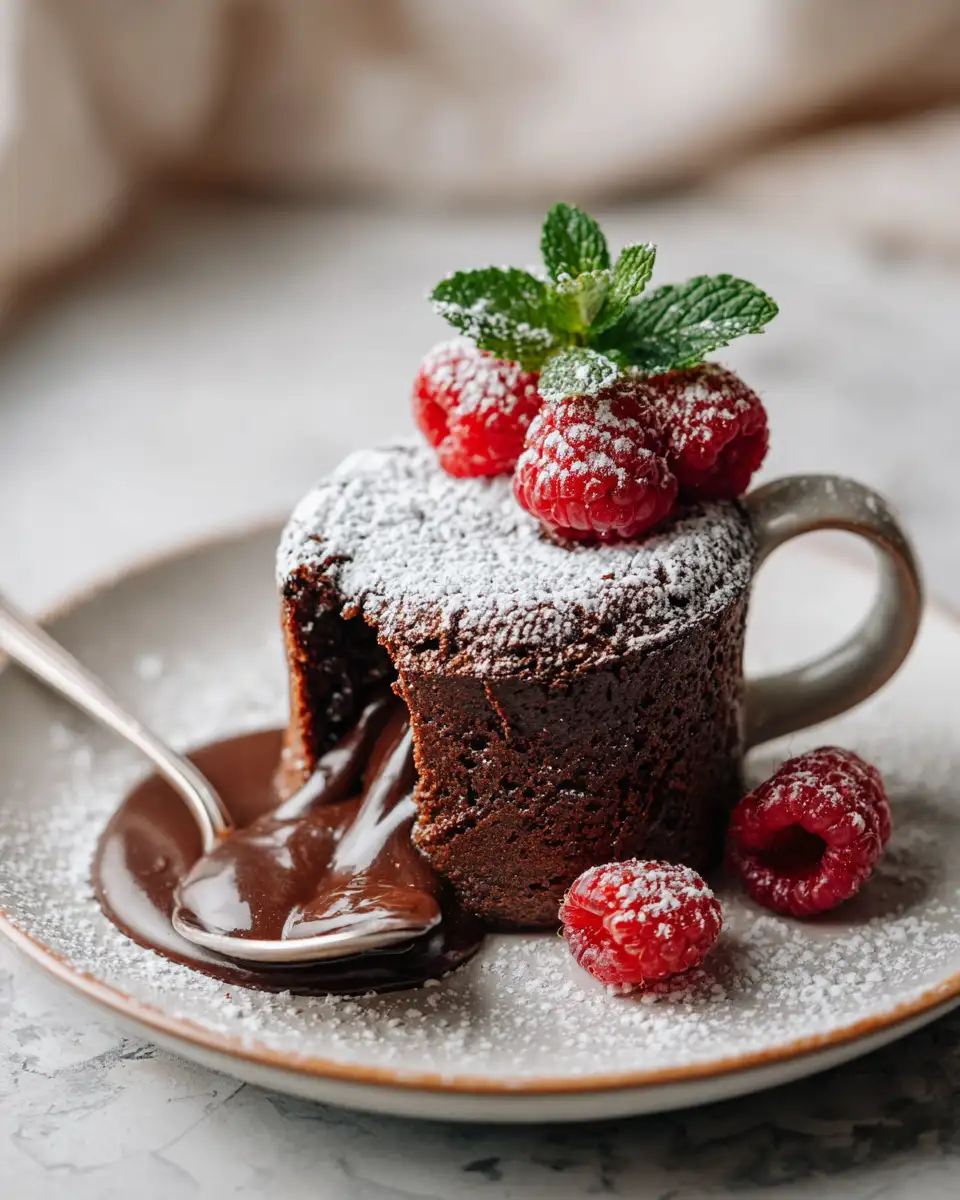
There’s something truly magical about a warm, gooey Chocolate Lava Mug Cake. It’s the kind of dessert that can turn any ordinary evening into a special occasion, inviting you to pause and savor the moment. Growing up in my bustling Mexican-American household, I learned early on that food has the power to bring people together and create lasting memories. Today, as I cozy up in my Charleston kitchen with my golden retriever, Biscuit, by my side, I’m excited to share with you a recipe that’s as delightful to make as it is to eat.
Table of Contents
Why You’ll Love This Chocolate Lava Mug Cake
This Chocolate Lava Mug Cake is the perfect blend of simplicity and indulgence. Whether you’re a seasoned baker or just looking for a quick fix to satisfy your sweet tooth, this recipe is a game-changer. It’s reminiscent of the spontaneous treats my abuela would whip up without a recipe — relying on her senses and love for her family. With just a few pantry staples and a microwave, you’ll have a dessert that feels both luxurious and homey. Plus, there’s nothing quite like the joy of digging into a warm, molten center that oozes with rich chocolate goodness.
Ingredients You’ll Need for This Chocolate Lava Mug Cake

- 4 tablespoons all-purpose flour
- 3 tablespoons granulated sugar
- 2 tablespoons unsweetened cocoa powder
- 1/4 teaspoon baking powder
- Pinch of salt
- 3 tablespoons milk (dairy or non-dairy)
- 2 tablespoons vegetable oil
- 1/4 teaspoon vanilla extract
- 1 tablespoon chocolate chips or a small piece of chocolate
If you’re out of cocoa powder, you can substitute with an extra tablespoon of chocolate chips for an even richer center. And if you’re feeling adventurous, add a dash of cinnamon to bring a hint of warmth and spice, a nod to my abuela’s secret ingredient in her chocolate desserts.
Nutrition Facts
- Calories: 350 per serving
- Protein: 4g
- Fat: 18g
- Carbohydrates: 45g
- Fiber: 3g
- Sugar: 28g
- Sodium: 150mg
This indulgent dessert is perfect for those moments when you need a little pick-me-up, providing a comforting balance of carbs, fats, and a touch of protein.
Print
Indulge in a Molten Delight: The Ultimate Chocolate Lava Mug Cake Experience
Learn how to make delicious Chocolate Lava Mug Cake. Easy recipe with step-by-step instructions.
- Total Time: 45 minutes
- Yield: 4 servings
Ingredients
- 4 tablespoons all-purpose flour
- 3 tablespoons granulated sugar
- 2 tablespoons unsweetened cocoa powder
- 1/4 teaspoon baking powder
- Pinch of salt
- 3 tablespoons milk (dairy or non-dairy)
- 2 tablespoons vegetable oil
- 1/4 teaspoon vanilla extract
- 1 tablespoon chocolate chips or a small piece of chocolate
If you’re out of cocoa powder, you can substitute with an extra tablespoon of chocolate chips for an even richer center. And if you’re feeling adventurous, add a dash of cinnamon to bring a hint of warmth and spice, a nod to my abuela’s secret ingredient in her chocolate desserts.
Instructions
- In a microwave-safe mug, combine the flour, sugar, cocoa powder, baking powder, and salt. Stir until evenly mixed.
- Add the milk, vegetable oil, and vanilla extract to the dry ingredients. Stir well until a smooth batter forms, making sure there are no lumps.
- Gently press the chocolate chips or piece of chocolate into the center of the batter. This will create the lava effect when cooked.
- Microwave the mug on high for 60-90 seconds. Keep an eye on it, as cooking times can vary based on your microwave’s power. The cake should rise, and the center should still be slightly gooey.
- Allow the mug cake to cool for a minute or two. It will be hot, and letting it rest will enhance the flavors.
As my abuela would say, let the aromas guide you. The smell of chocolate wafting through the kitchen always brings me back to those bustling family dinners, where dessert was the grand finale everyone eagerly awaited.
- Prep Time: 15 minutes
- Cook Time: 30 minutes
- Category: Main Dish
- Method: Cooking
- Cuisine: International
Steps to Create Your Chocolate Lava Mug Cake
- In a microwave-safe mug, combine the flour, sugar, cocoa powder, baking powder, and salt. Stir until evenly mixed.
- Add the milk, vegetable oil, and vanilla extract to the dry ingredients. Stir well until a smooth batter forms, making sure there are no lumps.
- Gently press the chocolate chips or piece of chocolate into the center of the batter. This will create the lava effect when cooked.
- Microwave the mug on high for 60-90 seconds. Keep an eye on it, as cooking times can vary based on your microwave’s power. The cake should rise, and the center should still be slightly gooey.
- Allow the mug cake to cool for a minute or two. It will be hot, and letting it rest will enhance the flavors.
As my abuela would say, let the aromas guide you. The smell of chocolate wafting through the kitchen always brings me back to those bustling family dinners, where dessert was the grand finale everyone eagerly awaited.
Tips for Making the Best Chocolate Lava Mug Cake
To ensure your mug cake turns out perfectly every time, here are a few tips I’ve learned through countless experiments in my kitchen:
- Use a microwave-safe mug that can hold at least 12 ounces to prevent overflow.
- If you prefer a more molten center, reduce the cooking time slightly. For a firmer cake, add an extra 10-15 seconds.
- Experiment with different add-ins like chopped nuts, a sprinkle of sea salt, or a dollop of peanut butter for added flavor and texture.
These little tweaks make each mug cake uniquely yours, much like how I adapted recipes growing up, adding my own flair to family favorites.
Serving Suggestions and Pairings

This Chocolate Lava Mug Cake is delightful on its own, but if you want to elevate the experience, consider these serving ideas:
- Top with a scoop of vanilla ice cream or a dollop of whipped cream for a classic pairing.
- Drizzle with caramel or chocolate sauce to enhance the richness.
- Add fresh berries or a sprig of mint for a pop of color and freshness.
Enjoying this cake with a steaming cup of coffee or a glass of cold milk can also be a comforting touch, similar to how my family would linger over meals, savoring every bite and moment together.
Storage and Reheating Tips
While this mug cake is best enjoyed fresh, you can store any leftovers by covering the mug with plastic wrap and keeping it in the refrigerator for up to two days. To reheat, simply microwave for 20-30 seconds, but note that the texture may become a bit denser. Like most things in life, this cake is best when savored in the moment, a philosophy my grandmother often reminded us of.
Frequently Asked Questions
What are the main ingredients for Chocolate Lava Mug Cake?
The main ingredients for Chocolate Lava Mug Cake include the items listed in our ingredients section above. Each ingredient plays a crucial role in achieving the perfect flavor and texture.
How long does it take to make Chocolate Lava Mug Cake?
The total time to make Chocolate Lava Mug Cake includes both preparation and cooking time. Check the recipe card above for exact timing details.
Can I make Chocolate Lava Mug Cake ahead of time?
Yes, Chocolate Lava Mug Cake can often be prepared in advance. Store it properly in an airtight container in the refrigerator and consume within the recommended timeframe.
What can I serve with Chocolate Lava Mug Cake?
Chocolate Lava Mug Cake pairs well with various sides and accompaniments. Consider the serving suggestions mentioned in the recipe for the best dining experience.
Is Chocolate Lava Mug Cake suitable for special diets?
Depending on the ingredients used, Chocolate Lava Mug Cake may be adapted for various dietary needs. Check the ingredients list and consider substitutions as needed for your dietary requirements.
Final Thoughts
Creating a Chocolate Lava Mug Cake is more than just making a dessert; it’s about taking a moment to indulge in something sweet and special. It’s a reminder that cooking doesn’t have to be complicated to be meaningful. Whether you’re sharing this treat with loved ones or enjoying it solo on a quiet evening, I hope it brings you as much joy as it does for me. Cooking has always been my way of connecting with my roots and with others, and through recipes like this, I hope to inspire you to find joy in the little things, one delicious bite at a time.
Happy cooking, and may your kitchen be filled with warmth and laughter, just as mine always has been.

")