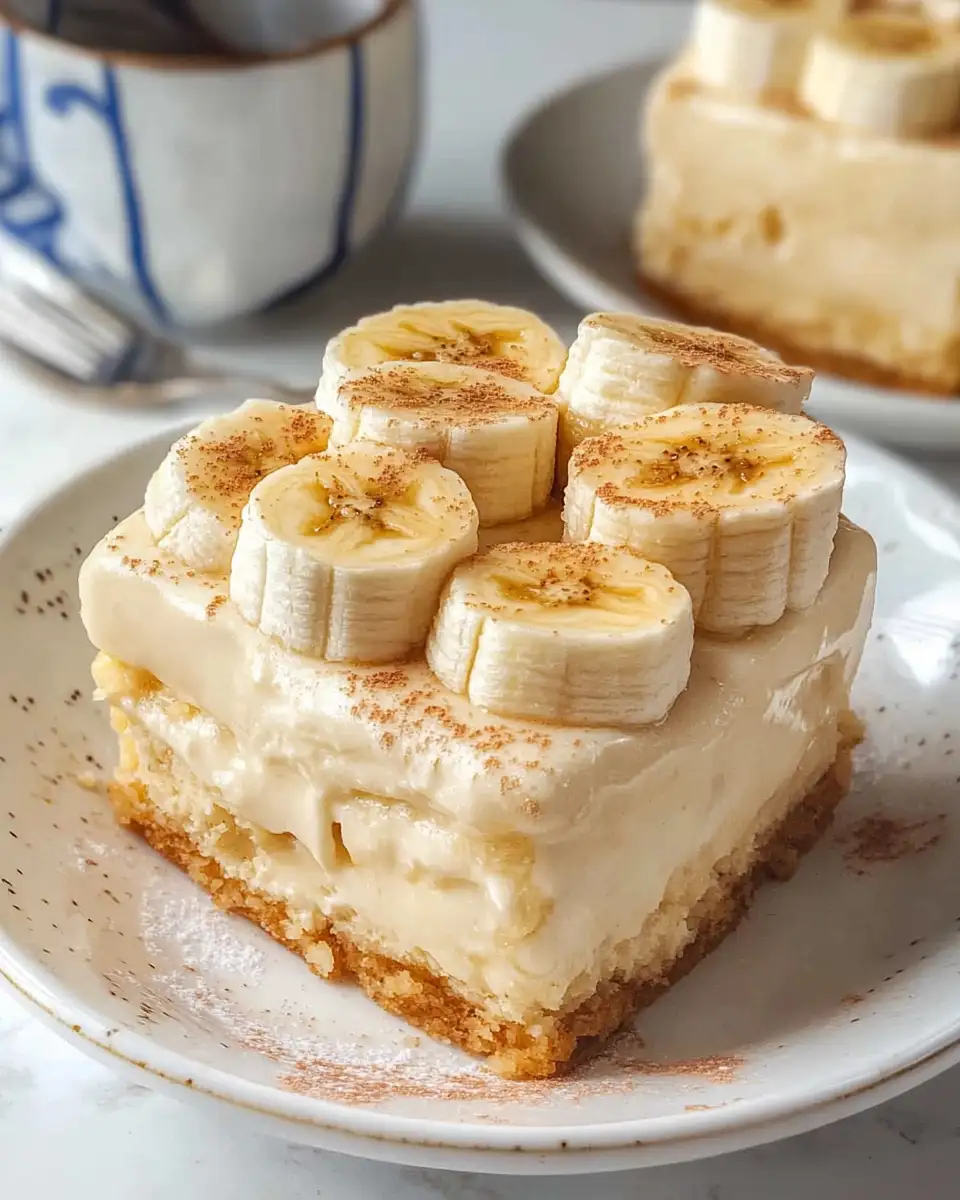
Welcome to my cozy corner of the internet, where flavors dance and stories come alive! Today, I’m sharing something close to my heart: “Not Yo Mama’s Banana Pudding.” This isn’t just any banana pudding, but a twist on a classic that brings together cherished memories from my childhood in Asheville with a touch of my own culinary flair. Growing up in a Mexican-American household, food was always a celebration, and desserts held a special place at our family table. I remember my abuela’s kitchen, filled with laughter and the sweet scents of cinnamon and vanilla. As I stir the creamy layers of this pudding, I can’t help but feel her presence guiding me. So, let’s dive into this delightful recipe that combines tradition with a dash of creativity, making it perfect for gatherings or a comforting day at home.
Table of Contents
Why You’ll Love This Not Yo Mama’s Banana Pudding
Not only is this banana pudding incredibly easy to make, but it also brings a fresh twist to a beloved classic. What makes it special? It’s the delightful combination of creamy custard, ripe bananas, and a crunchy cookie surprise that sets it apart. Whether you’re a busy mom, a student, or someone who just loves a good dessert, this recipe is designed to bring joy to your table without the fuss. And let’s face it, who doesn’t love a dessert that comes together in under 30 minutes?
Ingredients You’ll Need for This Not Yo Mama’s Banana Pudding

- 3 cups whole milk
- 1/2 cup granulated sugar
- 1/4 cup cornstarch
- 1/4 teaspoon salt
- 3 large egg yolks
- 2 teaspoons vanilla extract
- 4 ripe bananas, sliced
- 2 cups vanilla wafers (or your favorite crunchy cookie)
- 1 cup heavy cream
- 2 tablespoons powdered sugar
If you’re looking for a dairy-free option, you can substitute the whole milk with almond or coconut milk. And for those who prefer a gluten-free version, simply swap out the vanilla wafers with gluten-free cookies of your choice.
Nutrition Facts
- Calories: 350 per serving
- Protein: 6g
- Fat: 15g
- Carbohydrates: 50g
- Fiber: 3g
- Sugar: 28g
- Sodium: 150mg

Not Yo Mama’s Banana Pudding: A Twist on a Classic Dessert
Learn how to make delicious Mama’s Banana Pudding. Easy recipe with step-by-step instructions.
- Total Time: 45 minutes
- Yield: 4 servings
Ingredients
- 3 cups whole milk
- 1/2 cup granulated sugar
- 1/4 cup cornstarch
- 1/4 teaspoon salt
- 3 large egg yolks
- 2 teaspoons vanilla extract
- 4 ripe bananas, sliced
- 2 cups vanilla wafers (or your favorite crunchy cookie)
- 1 cup heavy cream
- 2 tablespoons powdered sugar
If you’re looking for a dairy-free option, you can substitute the whole milk with almond or coconut milk. And for those who prefer a gluten-free version, simply swap out the vanilla wafers with gluten-free cookies of your choice.
Instructions
- In a medium saucepan, combine the whole milk, granulated sugar, cornstarch, and salt. Whisk until smooth.
- Place the saucepan over medium heat and cook, stirring constantly, until the mixture begins to thicken and comes to a gentle boil, about 5-7 minutes.
- In a separate bowl, whisk the egg yolks. Gradually add a small amount of the hot milk mixture to the yolks, whisking continuously to temper them.
- Pour the tempered yolks back into the saucepan. Cook for another 2-3 minutes, stirring constantly, until the pudding is thick and creamy.
- Remove from heat and stir in the vanilla extract.
- In a glass or ceramic dish, layer the sliced bananas and vanilla wafers.
- Pour the warm pudding over the layers, spreading it evenly with a spatula.
- In a chilled bowl, beat the heavy cream with powdered sugar until soft peaks form. Spread or dollop over the top of the pudding.
- Refrigerate for at least 2 hours before serving, allowing the flavors to meld together beautifully.
- Prep Time: 15 minutes
- Cook Time: 30 minutes
- Category: Main Dish
- Method: Cooking
- Cuisine: International
Steps to Create Your Not Yo Mama’s Banana Pudding
- In a medium saucepan, combine the whole milk, granulated sugar, cornstarch, and salt. Whisk until smooth.
- Place the saucepan over medium heat and cook, stirring constantly, until the mixture begins to thicken and comes to a gentle boil, about 5-7 minutes.
- In a separate bowl, whisk the egg yolks. Gradually add a small amount of the hot milk mixture to the yolks, whisking continuously to temper them.
- Pour the tempered yolks back into the saucepan. Cook for another 2-3 minutes, stirring constantly, until the pudding is thick and creamy.
- Remove from heat and stir in the vanilla extract.
- In a glass or ceramic dish, layer the sliced bananas and vanilla wafers.
- Pour the warm pudding over the layers, spreading it evenly with a spatula.
- In a chilled bowl, beat the heavy cream with powdered sugar until soft peaks form. Spread or dollop over the top of the pudding.
- Refrigerate for at least 2 hours before serving, allowing the flavors to meld together beautifully.
Tips for Making the Best Not Yo Mama’s Banana Pudding
For a deeper flavor, consider caramelizing the bananas slightly before adding them to the dish. Just a quick sauté in butter with a sprinkle of brown sugar can elevate the pudding to a whole new level. And remember, patience is key! Allowing the pudding to chill thoroughly ensures the flavors are well developed and the texture is just right.
Serving Suggestions and Pairings

This banana pudding pairs wonderfully with a cup of freshly brewed coffee or a light, fruity tea. If you’re feeling indulgent, serve it alongside a scoop of vanilla ice cream for an extra creamy experience. It also makes a lovely end to a brunch spread or a sweet addition to any potluck gathering.
Storage and Reheating Tips
Store any leftovers in an airtight container in the refrigerator for up to three days. While this pudding is best enjoyed cold, you can also warm a portion gently in the microwave if you prefer a warm dessert. Just be sure not to overheat, as it can alter the texture of the pudding.
Frequently Asked Questions
What are the main ingredients for Mama’s Banana Pudding?
The main ingredients for Mama’s Banana Pudding include the items listed in our ingredients section above. Each ingredient plays a crucial role in achieving the perfect flavor and texture.
How long does it take to make Mama’s Banana Pudding?
The total time to make Mama’s Banana Pudding includes both preparation and cooking time. Check the recipe card above for exact timing details.
Can I make Mama’s Banana Pudding ahead of time?
Yes, Mama’s Banana Pudding can often be prepared in advance. Store it properly in an airtight container in the refrigerator and consume within the recommended timeframe.
What can I serve with Mama’s Banana Pudding?
Mama’s Banana Pudding pairs well with various sides and accompaniments. Consider the serving suggestions mentioned in the recipe for the best dining experience.
Is Mama’s Banana Pudding suitable for special diets?
Depending on the ingredients used, Mama’s Banana Pudding may be adapted for various dietary needs. Check the ingredients list and consider substitutions as needed for your dietary requirements.
Final Thoughts
Creating “Not Yo Mama’s Banana Pudding” is more than just making a dessert — it’s about crafting a moment that brings people together, just like the lively dinners of my childhood. Whether you’re recreating this for family or enjoying it solo, I hope it brings a slice of joy to your day and inspires you to share it with those you love. Happy cooking, and remember, the kitchen is where the magic happens!

")