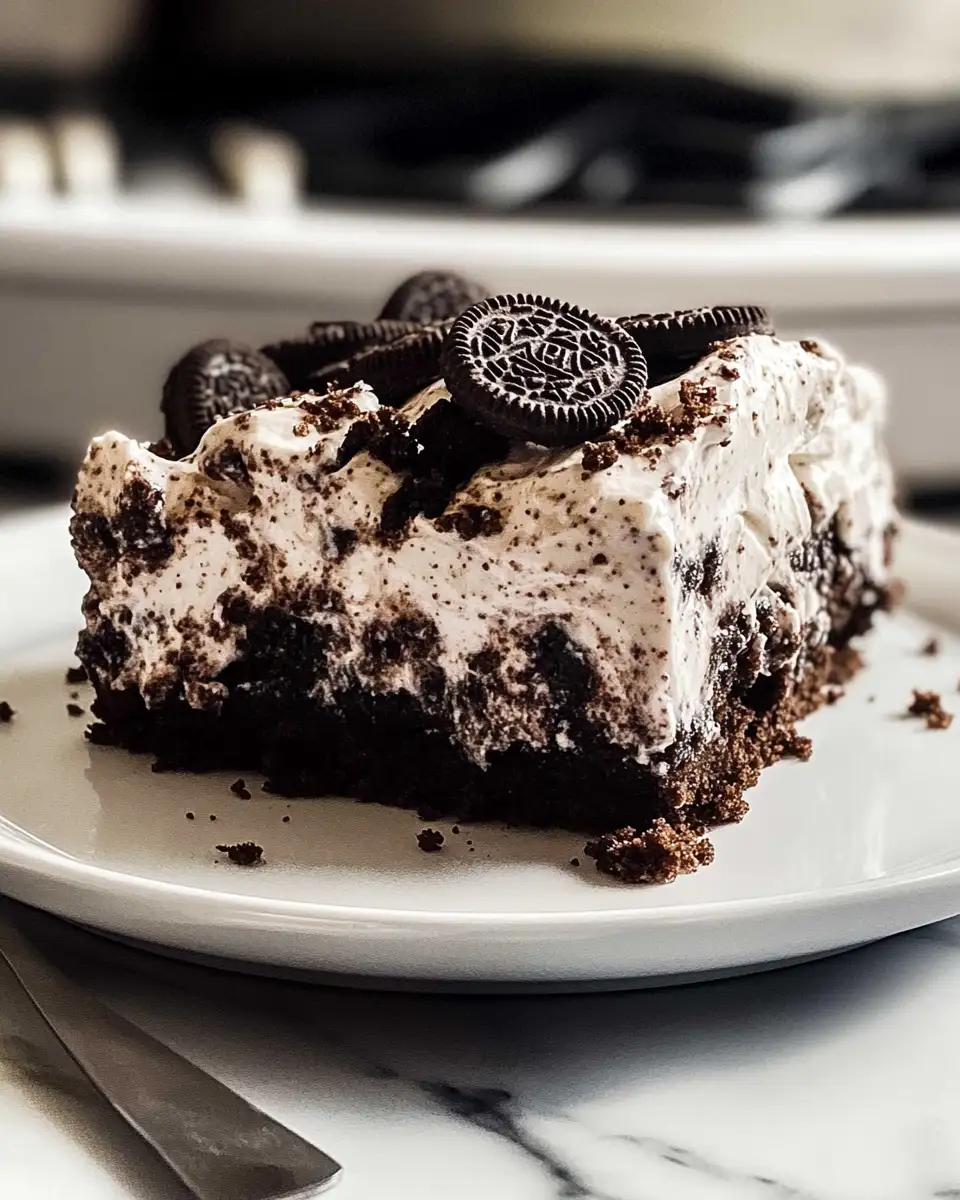
When I first heard the term “Oreo Dump Cake Recipe,” I was instantly intrigued. It sounded like a dessert that combined the simplicity and ease of a traditional dump cake with the indulgent flavor of my favorite childhood cookie. Growing up in a bustling Mexican-American household, our family kitchen was a place of constant experimentation, and I’ve carried that spirit into my own cooking adventures in Charleston. This Oreo Dump Cake is an example of how a few simple ingredients can come together to create something both comforting and delightful, much like the meals my grandmother used to whip up with whatever was on hand. So, let’s dive into this sweet treat that’s sure to become a new family favorite!
Table of Contents
Why You’ll Love This Oreo Dump Cake Recipe
This Oreo Dump Cake Recipe is the epitome of simplicity and flavor. Whether you’re a busy parent or a novice baker, you’ll find this dessert easy to make and a joy to eat. The rich, chocolatey base is complemented by the creamy texture of condensed milk and the iconic crunch of Oreo cookies. It’s a crowd-pleaser that doesn’t require hours of work, making it perfect for those last-minute gatherings or when you want to treat yourself after a long day. My grandmother always said that cooking should be about enjoyment, not stress, and this cake embodies that philosophy. Plus, it’s a great way to get the whole family involved in the kitchen, even if it’s just for the fun of smashing Oreos!
Ingredients You’ll Need for This Oreo Dump Cake Recipe

- 1 box of chocolate cake mix (about 15.25 ounces)
- 1 can of sweetened condensed milk (14 ounces)
- 1 stick of unsalted butter, melted
- 1 package of Oreo cookies (14.3 ounces), crushed
- 1 cup of milk chocolate chips
- 1 teaspoon of vanilla extract
For a twist, you can substitute the chocolate cake mix with a vanilla or red velvet mix for a different flavor profile. If you’re feeling adventurous, try adding a handful of chopped nuts or a sprinkle of sea salt for an extra layer of flavor.
Nutrition Facts
- Calories: 450 per serving
- Protein: 5g
- Fat: 20g
- Carbohydrates: 60g
- Fiber: 2g
- Sugar: 40g
- Sodium: 350mg
Remember, this cake is meant to be a treat, so enjoy it in moderation. I always say, “Balance is key,” a lesson I learned from countless family dinners where dessert was the reward for eating our veggies!
Print
Irresistible Oreo Dump Cake Recipe You Need to Try Today
Learn how to make delicious Oreo Dump Cake Recipe. Easy recipe with step-by-step instructions.
- Total Time: 45 minutes
- Yield: 4 servings
Ingredients
- 1 box of chocolate cake mix (about 15.25 ounces)
- 1 can of sweetened condensed milk (14 ounces)
- 1 stick of unsalted butter, melted
- 1 package of Oreo cookies (14.3 ounces), crushed
- 1 cup of milk chocolate chips
- 1 teaspoon of vanilla extract
For a twist, you can substitute the chocolate cake mix with a vanilla or red velvet mix for a different flavor profile. If you’re feeling adventurous, try adding a handful of chopped nuts or a sprinkle of sea salt for an extra layer of flavor.
Instructions
- Preheat your oven to 350°F (175°C) and grease a 9×13-inch baking dish.
- Spread the crushed Oreo cookies evenly in the bottom of the prepared baking dish.
- In a large bowl, combine the chocolate cake mix with the melted butter, stirring until you get a crumbly mixture.
- Sprinkle the cake mix mixture over the layer of crushed Oreos in the baking dish.
- Pour the sweetened condensed milk evenly over the top of the cake mix layer.
- Sprinkle the milk chocolate chips on top, followed by a drizzle of vanilla extract.
- Bake in the preheated oven for 25-30 minutes, or until the top is bubbly and set.
- Let the cake cool for at least 10 minutes before serving to allow everything to set properly.
As you bake, the delightful aroma will fill your kitchen, reminding me of the lively atmosphere of my childhood home, where the smell of fresh tortillas often mingled with the scent of dessert baking in the oven.
- Prep Time: 15 minutes
- Cook Time: 30 minutes
- Category: Main Dish
- Method: Cooking
- Cuisine: International
Steps to Create Your Oreo Dump Cake Recipe
- Preheat your oven to 350°F (175°C) and grease a 9×13-inch baking dish.
- Spread the crushed Oreo cookies evenly in the bottom of the prepared baking dish.
- In a large bowl, combine the chocolate cake mix with the melted butter, stirring until you get a crumbly mixture.
- Sprinkle the cake mix mixture over the layer of crushed Oreos in the baking dish.
- Pour the sweetened condensed milk evenly over the top of the cake mix layer.
- Sprinkle the milk chocolate chips on top, followed by a drizzle of vanilla extract.
- Bake in the preheated oven for 25-30 minutes, or until the top is bubbly and set.
- Let the cake cool for at least 10 minutes before serving to allow everything to set properly.
As you bake, the delightful aroma will fill your kitchen, reminding me of the lively atmosphere of my childhood home, where the smell of fresh tortillas often mingled with the scent of dessert baking in the oven.
Tips for Making the Best Oreo Dump Cake Recipe
To ensure your Oreo Dump Cake is a hit, here are some tips I’ve picked up over the years:
- Use a high-quality chocolate cake mix for the best flavor.
- For a richer taste, try using dark chocolate chips instead of milk chocolate.
- Let the cake cool slightly before serving to help it hold its shape better.
- Feel free to experiment with additional toppings like whipped cream or a scoop of vanilla ice cream.
My abuela taught me that cooking is as much about intuition as it is about following recipes. Don’t be afraid to trust your instincts and make this dish your own!
Serving Suggestions and Pairings

This Oreo Dump Cake pairs wonderfully with a scoop of vanilla or coffee ice cream, balancing the cake’s rich chocolate flavor. For a refreshing twist, serve it with fresh berries or a dollop of whipped cream. On a cozy evening, enjoy it with a cup of hot cocoa or a glass of milk. It’s perfect for sharing at potlucks, family gatherings, or just as a treat for yourself after a long day of work or play.
Storage and Reheating Tips
Store any leftover cake in an airtight container in the refrigerator for up to five days. To reheat, simply warm a portion in the microwave for 20-30 seconds to restore its gooey texture. If you’re planning to make this cake in advance, it also freezes well for up to three months. Just wrap individual portions in plastic wrap and place them in a freezer-safe bag.
Having a stash of homemade treats in the freezer is a trick I learned from my mom, who always had something delicious ready for unexpected guests or a quick dessert craving.
Frequently Asked Questions
What are the main ingredients for Oreo Dump Cake Recipe?
The main ingredients for Oreo Dump Cake Recipe include the items listed in our ingredients section above. Each ingredient plays a crucial role in achieving the perfect flavor and texture.
How long does it take to make Oreo Dump Cake Recipe?
The total time to make Oreo Dump Cake Recipe includes both preparation and cooking time. Check the recipe card above for exact timing details.
Can I make Oreo Dump Cake Recipe ahead of time?
Yes, Oreo Dump Cake Recipe can often be prepared in advance. Store it properly in an airtight container in the refrigerator and consume within the recommended timeframe.
What can I serve with Oreo Dump Cake Recipe?
Oreo Dump Cake Recipe pairs well with various sides and accompaniments. Consider the serving suggestions mentioned in the recipe for the best dining experience.
Is Oreo Dump Cake Recipe suitable for special diets?
Depending on the ingredients used, Oreo Dump Cake Recipe may be adapted for various dietary needs. Check the ingredients list and consider substitutions as needed for your dietary requirements.
Final Thoughts
This Oreo Dump Cake Recipe is more than just a dessert — it’s an invitation to gather, share, and enjoy the simple pleasures of homemade baking. It’s a reminder of the lively kitchen of my childhood, where each dish was a celebration of family and flavors. Whether you’re a seasoned baker or just starting your culinary journey, I hope this recipe brings joy to your table and inspires you to create and share your own delicious memories. Happy cooking!


")