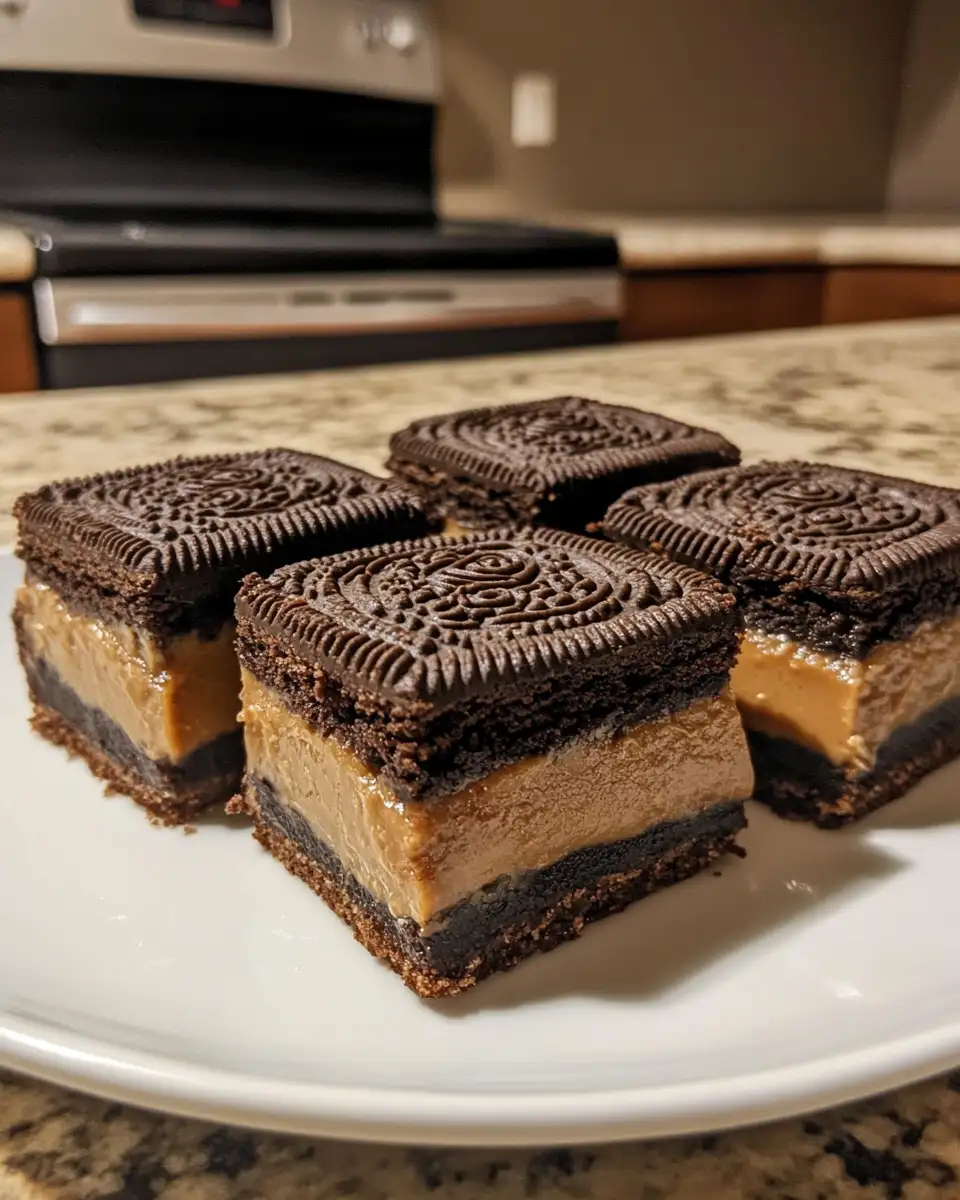
Welcome to my cozy corner of the internet, where today I have a delicious treat to share with you: Oreo Peanut Butter Bars. These bars are the kind of dessert that effortlessly brings together the creamy richness of peanut butter with the satisfying crunch of Oreos. They remind me of the loud, joyful kitchens of my childhood, where flavors mingled as freely as the laughter. Growing up in Asheville, North Carolina, our home was filled with the warm aromas of my grandmother’s Mexican cooking, but it was also a place where we embraced new and exciting flavors. This recipe is a nod to those colorful days, combining simplicity with a touch of indulgence. So, let’s dive into the delightful world of Oreo Peanut Butter Bars!
Table of Contents
Why You’ll Love This Oreo Peanut Butter Bars
These Oreo Peanut Butter Bars are a delightful fusion of textures and flavors that will make you fall in love with their simplicity and taste. Whether you’re a busy parent like I often am, or someone who just loves experimenting in the kitchen, these bars are designed with you in mind. They’re quick to prepare, needing just a few ingredients, and they bring back memories of family gatherings where we would enjoy sweets together, with everyone reaching for seconds.
What I particularly love about this recipe is how it brings together the comfort of peanut butter — a staple in many American homes — with the childhood delight of Oreos. These bars are perfect for sharing during a casual get-together, or for enjoying as a personal treat when you need a little pick-me-up. Plus, who can resist the nostalgia of digging into a dessert that feels both familiar and entirely new?
Ingredients You’ll Need for This Oreo Peanut Butter Bars

- 24 Oreo cookies
- 1/2 cup unsalted butter, melted
- 1 cup creamy peanut butter
- 1/4 cup granulated sugar
- 1/4 cup brown sugar, packed
- 1 large egg
- 1 teaspoon vanilla extract
- 1/2 teaspoon salt
- 1 cup all-purpose flour
- 1/2 teaspoon baking powder
- 1/2 cup semi-sweet chocolate chips (optional, for extra indulgence)
If you’re looking to spice things up, try substituting crunchy peanut butter for an added texture or using dark chocolate chips if you prefer a richer flavor. These small tweaks can personalize the bars to suit your taste perfectly.
Nutrition Facts
- Calories: 320 per serving
- Protein: 6g
- Fat: 18g
- Carbohydrates: 35g
- Fiber: 2g
- Sugar: 20g
- Sodium: 180mg
These bars are a decadent treat, perfect for an occasional indulgence. They’re best enjoyed as part of a balanced diet, which, as my grandmother always said, is key to a happy life.
Print
Indulge in Irresistible Oreo Peanut Butter Bars Bliss
Learn how to make delicious Oreo Peanut Butter Bars. Easy recipe with step-by-step instructions.
- Total Time: 45 minutes
- Yield: 4 servings
Ingredients
- 24 Oreo cookies
- 1/2 cup unsalted butter, melted
- 1 cup creamy peanut butter
- 1/4 cup granulated sugar
- 1/4 cup brown sugar, packed
- 1 large egg
- 1 teaspoon vanilla extract
- 1/2 teaspoon salt
- 1 cup all-purpose flour
- 1/2 teaspoon baking powder
- 1/2 cup semi-sweet chocolate chips (optional, for extra indulgence)
If you’re looking to spice things up, try substituting crunchy peanut butter for an added texture or using dark chocolate chips if you prefer a richer flavor. These small tweaks can personalize the bars to suit your taste perfectly.
Instructions
- Preheat your oven to 350°F (175°C) and line an 8×8-inch baking dish with parchment paper, leaving some overhang for easy removal.
- In a food processor, pulse the Oreo cookies until finely crushed. Combine the crushed Oreos with the melted butter in a bowl, mixing until well combined.
- Press the Oreo mixture firmly into the bottom of the prepared baking dish to form an even crust. Set aside.
- In a large bowl, beat together the peanut butter, granulated sugar, and brown sugar until creamy and smooth.
- Add the egg and vanilla extract to the peanut butter mixture, beating until fully incorporated.
- In a separate bowl, whisk together the flour, baking powder, and salt. Gradually add the dry ingredients to the peanut butter mixture, stirring until just combined. Fold in the chocolate chips, if using.
- Spread the peanut butter mixture over the Oreo crust in the baking dish, smoothing the top with a spatula.
- Bake for 20-25 minutes, or until the edges are just beginning to brown and a toothpick inserted into the center comes out mostly clean.
- Allow the bars to cool completely in the pan on a wire rack before lifting them out using the parchment overhang. Cut into squares and enjoy!
It’s a simple process, but remember — patience is key! Letting the bars cool completely ensures they hold together beautifully when cut.
- Prep Time: 15 minutes
- Cook Time: 30 minutes
- Category: Main Dish
- Method: Cooking
- Cuisine: International
Steps to Create Your Oreo Peanut Butter Bars
- Preheat your oven to 350°F (175°C) and line an 8×8-inch baking dish with parchment paper, leaving some overhang for easy removal.
- In a food processor, pulse the Oreo cookies until finely crushed. Combine the crushed Oreos with the melted butter in a bowl, mixing until well combined.
- Press the Oreo mixture firmly into the bottom of the prepared baking dish to form an even crust. Set aside.
- In a large bowl, beat together the peanut butter, granulated sugar, and brown sugar until creamy and smooth.
- Add the egg and vanilla extract to the peanut butter mixture, beating until fully incorporated.
- In a separate bowl, whisk together the flour, baking powder, and salt. Gradually add the dry ingredients to the peanut butter mixture, stirring until just combined. Fold in the chocolate chips, if using.
- Spread the peanut butter mixture over the Oreo crust in the baking dish, smoothing the top with a spatula.
- Bake for 20-25 minutes, or until the edges are just beginning to brown and a toothpick inserted into the center comes out mostly clean.
- Allow the bars to cool completely in the pan on a wire rack before lifting them out using the parchment overhang. Cut into squares and enjoy!
It’s a simple process, but remember — patience is key! Letting the bars cool completely ensures they hold together beautifully when cut.
Tips for Making the Best Oreo Peanut Butter Bars
Here are a few tips to ensure your bars turn out perfectly every time:
- Chill the Bars: If you want clean, sharp edges when cutting, consider chilling the bars in the fridge for about 30 minutes before slicing.
- Room Temperature Ingredients: Ensure your egg and peanut butter are at room temperature for easier mixing and a smoother batter.
- Don’t Overbake: These bars are meant to be soft and chewy, so keep an eye on them and take them out of the oven when they just start to brown.
These tips come from years of baking and learning from both my successes and my kitchen mishaps — it’s all part of the process!
Serving Suggestions and Pairings

These Oreo Peanut Butter Bars are delightful on their own, but if you’re feeling a bit adventurous, here are some pairing ideas:
- Ice Cream: Serve warm bars with a scoop of vanilla or chocolate ice cream for an extra indulgent treat.
- Milk: A cold glass of milk complements the richness of these bars perfectly, just like the classic Oreo and milk combo.
- Coffee: Pair with a hot cup of coffee for a delightful afternoon pick-me-up.
These combinations remind me of family Friday nights, where dessert was always a little more special, and everyone had their own favorite way of enjoying it.
Storage and Reheating Tips
To store your Oreo Peanut Butter Bars:
- Room Temperature: Store in an airtight container at room temperature for up to 3 days.
- Refrigerate: For longer storage, keep them in the fridge for up to a week.
- Freeze: These bars freeze well! Wrap each bar individually in plastic wrap and store in a freezer-safe bag for up to 2 months.
To enjoy them warm, simply microwave for about 15-20 seconds, and they’ll be just as gooey and delicious as the day you baked them.
Frequently Asked Questions
What are the main ingredients for Oreo Peanut Butter Bars?
The main ingredients for Oreo Peanut Butter Bars include the items listed in our ingredients section above. Each ingredient plays a crucial role in achieving the perfect flavor and texture.
How long does it take to make Oreo Peanut Butter Bars?
The total time to make Oreo Peanut Butter Bars includes both preparation and cooking time. Check the recipe card above for exact timing details.
Can I make Oreo Peanut Butter Bars ahead of time?
Yes, Oreo Peanut Butter Bars can often be prepared in advance. Store it properly in an airtight container in the refrigerator and consume within the recommended timeframe.
What can I serve with Oreo Peanut Butter Bars?
Oreo Peanut Butter Bars pairs well with various sides and accompaniments. Consider the serving suggestions mentioned in the recipe for the best dining experience.
Is Oreo Peanut Butter Bars suitable for special diets?
Depending on the ingredients used, Oreo Peanut Butter Bars may be adapted for various dietary needs. Check the ingredients list and consider substitutions as needed for your dietary requirements.
Final Thoughts
Creating these Oreo Peanut Butter Bars is like inviting a bit of childhood joy and family warmth into your kitchen. They’re a testament to the magic that happens when you combine simple ingredients with a dash of creativity and a love for cooking. As you take that first bite, I hope you feel a connection to the colorful, bustling kitchens of my past, and find comfort in the simplicity and joy of home cooking. Happy baking, and as always, happy eating!

")