Welcome to my cozy corner of the internet, where food and family memories collide to create delicious experiences. Today, I’m thrilled to share a recipe that holds a special place in my heart: Simple Cherry Pie Bars. Not only are these bars a delightful twist on a classic dessert, but they also remind me of the vibrant, bustling kitchen of my childhood in Asheville. Growing up in a lively Mexican-American household, our kitchen was filled with laughter, stories, and the irresistible aroma of homemade goodness. Now, as I continue my culinary journey in Charleston, I aim to bring that same warmth and simplicity to your home with these cherry pie bars.
Table of Contents
Why You’ll Love This Simple Cherry Pie Bars
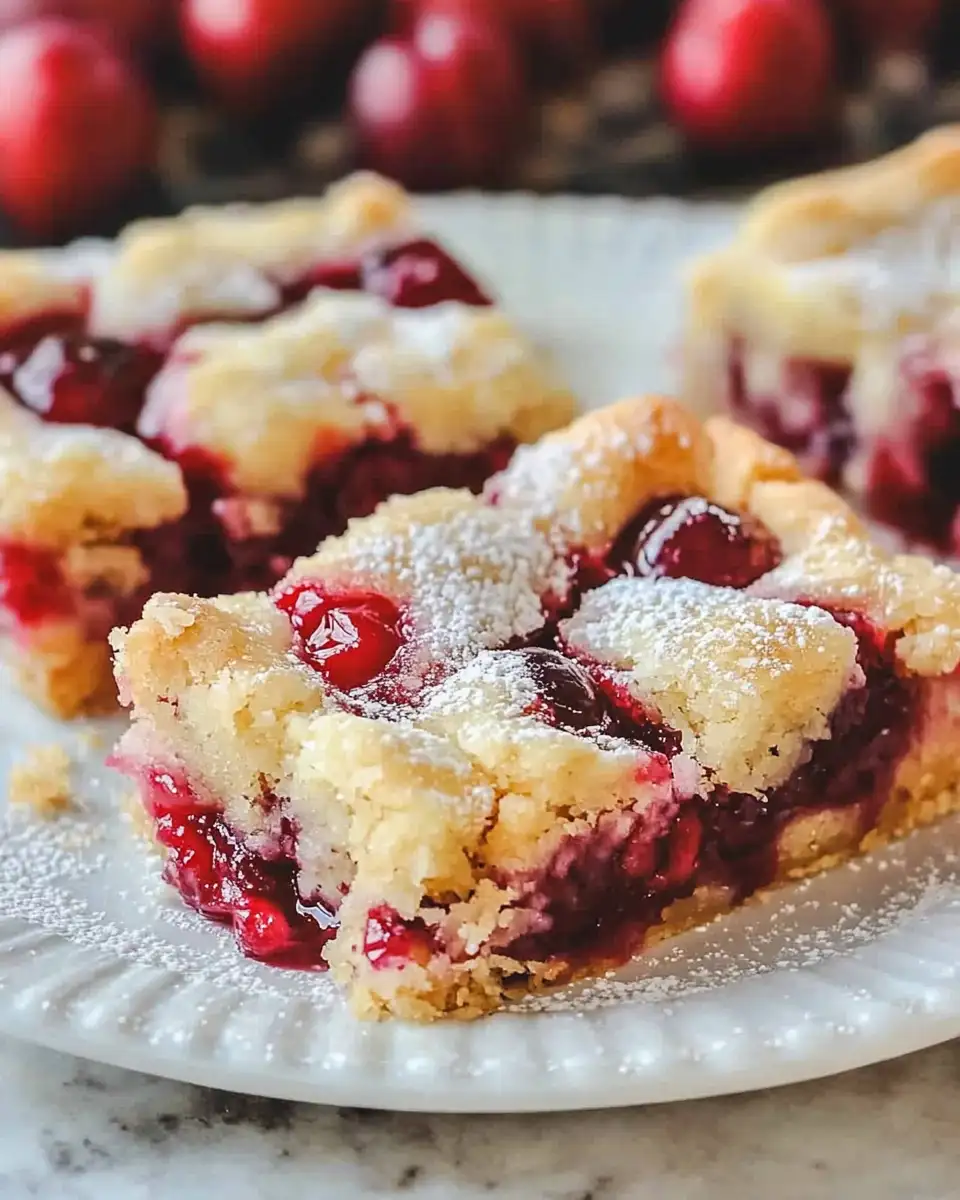
These Simple Cherry Pie Bars are the epitome of comfort and convenience. Imagine the flavors of a traditional cherry pie, but in a more manageable, hand-held form. They’re perfect for busy weeknights when you crave something sweet but don’t want the hassle of making an entire pie. I remember the first time I made these bars; it was a rainy Saturday, much like those I spent with my grandmother, rolling out dough for tortillas. The bars came together easily, and the aroma of cherries and buttery crust filled my kitchen, instantly taking me back to those cherished moments. Whether you’re new to baking or a seasoned pro, these bars offer a straightforward approach to creating a dessert that’s both satisfying and full of flavor.
Ingredients You’ll Need for This Simple Cherry Pie Bars

- 1 cup unsalted butter, softened
- 1 3/4 cups granulated sugar
- 4 large eggs
- 1 teaspoon vanilla extract
- 3 cups all-purpose flour
- 1 teaspoon salt
- 1 (21 oz) can cherry pie filling
- Optional: 1/2 teaspoon almond extract for a nutty hint
- Powdered sugar for dusting
Feel free to experiment with different fruit fillings or even make your cherry pie filling from scratch if you have the time. My abuela always insisted on fresh ingredients whenever possible, and her wisdom has certainly rubbed off on me!
Nutrition Facts
- Calories: 280 per serving
- Protein: 3g
- Fat: 12g
- Carbohydrates: 42g
- Fiber: 1g
- Sugar: 25g
- Sodium: 180mg
These bars are a delightful indulgence, so savor them as a treat, just like a cherished family recipe passed down through generations.
Print
Irresistibly Easy Cherry Pie Bars for Dessert Lovers Everywhere
Learn how to make delicious Simple Cherry Pie Bars. Easy recipe with step-by-step instructions.
- Total Time: 45 minutes
- Yield: 4 servings
Ingredients
- 1 cup unsalted butter, softened
- 1 3/4 cups granulated sugar
- 4 large eggs
- 1 teaspoon vanilla extract
- 3 cups all-purpose flour
- 1 teaspoon salt
- 1 (21 oz) can cherry pie filling
- Optional: 1/2 teaspoon almond extract for a nutty hint
- Powdered sugar for dusting
Feel free to experiment with different fruit fillings or even make your cherry pie filling from scratch if you have the time. My abuela always insisted on fresh ingredients whenever possible, and her wisdom has certainly rubbed off on me!
Instructions
- Preheat your oven to 350°F (175°C) and line a 9×13 inch baking pan with parchment paper.
- In a large bowl, cream together the butter and sugar until light and fluffy, about 3-4 minutes. This step reminds me of helping my abuela, her hands guiding mine as we mixed ingredients with love.
- Add the eggs, one at a time, beating well after each addition. Stir in the vanilla extract, and if you like, a splash of almond extract for that extra touch.
- In a separate bowl, whisk together the flour and salt. Gradually add the dry ingredients to the wet ingredients, mixing until just combined.
- Spread 2/3 of the batter evenly into the prepared pan. Top with the cherry pie filling, spreading it evenly over the batter.
- Drop spoonfuls of the remaining batter over the cherry layer. It doesn’t have to be perfect; the rustic look is part of their charm, much like the imperfectly perfect dishes of my childhood.
- Bake for 35-40 minutes, or until the top is golden brown and a toothpick inserted into the center comes out clean.
- Allow the bars to cool completely in the pan on a wire rack before cutting into squares. Dust with powdered sugar before serving for a sweet finishing touch.
- Prep Time: 15 minutes
- Cook Time: 30 minutes
- Category: Main Dish
- Method: Cooking
- Cuisine: International
Steps to Create Your Simple Cherry Pie Bars
- Preheat your oven to 350°F (175°C) and line a 9×13 inch baking pan with parchment paper.
- In a large bowl, cream together the butter and sugar until light and fluffy, about 3-4 minutes. This step reminds me of helping my abuela, her hands guiding mine as we mixed ingredients with love.
- Add the eggs, one at a time, beating well after each addition. Stir in the vanilla extract, and if you like, a splash of almond extract for that extra touch.
- In a separate bowl, whisk together the flour and salt. Gradually add the dry ingredients to the wet ingredients, mixing until just combined.
- Spread 2/3 of the batter evenly into the prepared pan. Top with the cherry pie filling, spreading it evenly over the batter.
- Drop spoonfuls of the remaining batter over the cherry layer. It doesn’t have to be perfect; the rustic look is part of their charm, much like the imperfectly perfect dishes of my childhood.
- Bake for 35-40 minutes, or until the top is golden brown and a toothpick inserted into the center comes out clean.
- Allow the bars to cool completely in the pan on a wire rack before cutting into squares. Dust with powdered sugar before serving for a sweet finishing touch.
Tips for Making the Best Simple Cherry Pie Bars
To make sure your cherry pie bars turn out perfectly every time, here are a few tips from my kitchen to yours:
If the batter seems too thick, don’t worry; that’s how it should be! The thickness helps create a sturdy base for the cherry filling.
Don’t rush the cooling process. Letting the bars cool completely in the pan ensures they hold their shape when cut.
Remember, cooking is all about following your senses. Trust your instincts, as my grandmother always said, and you’ll end up with something wonderful.
Serving Suggestions and Pairings

Simple Cherry Pie Bars are versatile and can be served in various delightful ways. They pair beautifully with a scoop of vanilla ice cream or a dollop of whipped cream. On a sunny day, serve them with iced tea or lemonade for a refreshing contrast. For a cozy evening, a warm mug of tea or coffee complements their sweetness perfectly. Whenever I serve them, I’m reminded of the gatherings with family and friends, where each bite was accompanied by stories and laughter.
Storage and Reheating Tips
To store any leftover bars, place them in an airtight container and refrigerate for up to five days. You can also freeze them for up to three months — just wrap them tightly in plastic wrap and place in a freezer-safe bag. To enjoy, simply thaw in the refrigerator overnight. If you prefer them warm, a quick reheat in the microwave for about 10-15 seconds does the trick. These bars are a great make-ahead treat, perfect for preparing in advance and enjoying at your leisure.
Frequently Asked Questions
What are the main ingredients for Simple Cherry Pie Bars?
The main ingredients for Simple Cherry Pie Bars include the items listed in our ingredients section above. Each ingredient plays a crucial role in achieving the perfect flavor and texture.
How long does it take to make Simple Cherry Pie Bars?
The total time to make Simple Cherry Pie Bars includes both preparation and cooking time. Check the recipe card above for exact timing details.
Can I make Simple Cherry Pie Bars ahead of time?
Yes, Simple Cherry Pie Bars can often be prepared in advance. Store it properly in an airtight container in the refrigerator and consume within the recommended timeframe.
What can I serve with Simple Cherry Pie Bars?
Simple Cherry Pie Bars pairs well with various sides and accompaniments. Consider the serving suggestions mentioned in the recipe for the best dining experience.
Is Simple Cherry Pie Bars suitable for special diets?
Depending on the ingredients used, Simple Cherry Pie Bars may be adapted for various dietary needs. Check the ingredients list and consider substitutions as needed for your dietary requirements.
Final Thoughts
Creating these Simple Cherry Pie Bars is more than just baking; it’s an opportunity to connect with cherished memories and flavors. From the bustling kitchen of my childhood to my own home in Charleston, these bars carry with them the joy and simplicity of home-cooked goodness. Whether you’re sharing them with loved ones or enjoying a quiet moment to yourself, I hope these bars bring a little bit of sweetness and warmth to your day. Happy cooking, and remember — anyone can create something delicious with a dash of creativity and a sprinkle of love.

")