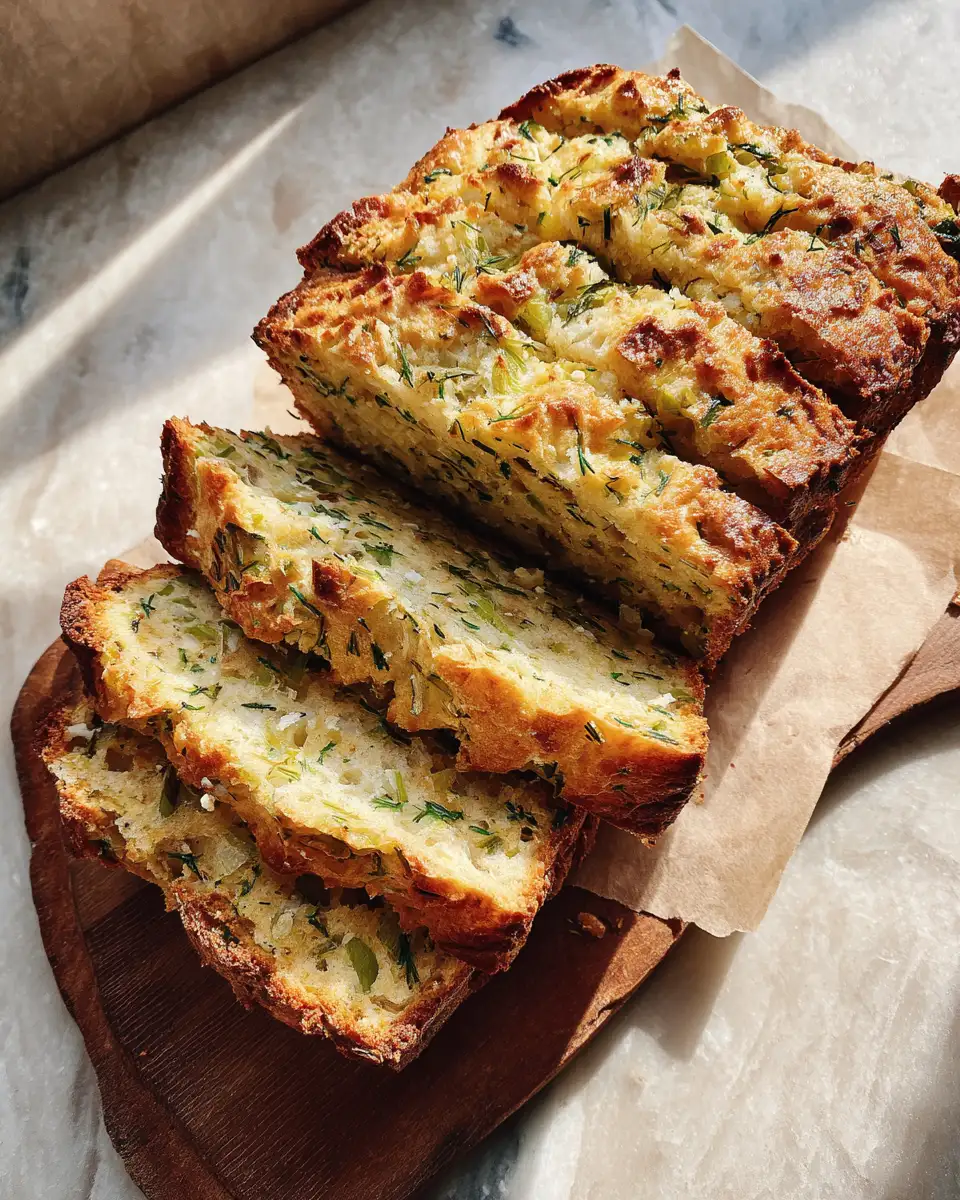
The first time I heard about Dill Pickle Bread, I was intrigued, and just a little skeptical. But, given my love for pickles and baking, I figured it was worth a shot. Growing up in my lively Mexican-American household in Asheville, food was always an adventure, and this bread turned out to be no exception. Now, it’s a staple in my Charleston kitchen, where Biscuit, our golden retriever, is always eager for a crumb to drop. Let’s dive into this unique recipe and explore how this savory delight can become a delicious addition to your own home-cooked meals.
Table of Contents
Why You’ll Love This Dill Pickle Bread
If you’re anything like me, you find joy in the unexpected twists that cooking can bring. Dill Pickle Bread offers that surprise element in the best way possible. This bread is a wonderful blend of tangy, herby, and savory flavors that dance on your palate. It’s the kind of dish that reminds me of my abuela’s kitchen, where creativity was a key ingredient. Beyond its flavor, this bread is versatile and can be paired with a variety of dishes, making it a crowd-pleaser for any occasion. With its easy preparation, it’s perfect for both novice bakers and seasoned chefs looking for something new and exciting.
Ingredients You’ll Need for This Dill Pickle Bread

To create this delicious Dill Pickle Bread, you’ll need a few simple ingredients that you might already have in your pantry. Here’s what you’ll need:
- 2 cups all-purpose flour
- 1 tablespoon baking powder
- 1 teaspoon salt
- 1/2 teaspoon garlic powder
- 1/2 teaspoon onion powder
- 1 cup dill pickle juice
- 1/4 cup vegetable oil
- 2 large eggs
- 1 cup chopped dill pickles
- 1 tablespoon fresh dill, chopped (or 1 teaspoon dried dill)
If you’re feeling adventurous, consider substituting the vegetable oil with olive oil for a richer flavor, or add a pinch of cayenne pepper for a little heat.
Nutrition Facts
- Calories: 230 per serving
- Protein: 5g
- Fat: 9g
- Carbohydrates: 31g
- Fiber: 1g
- Sugar: 1g
- Sodium: 450mg
These values are based on one slice, making this bread a fairly light option that’s perfect for snacking or accompanying a main dish.
Print
Dill Pickle Bread: A Tangy Twist on Homemade Loaves
Learn how to make delicious Dill Pickle Bread. Easy recipe with step-by-step instructions.
- Total Time: 45 minutes
- Yield: 4 servings
Ingredients
To create this delicious Dill Pickle Bread, you’ll need a few simple ingredients that you might already have in your pantry. Here’s what you’ll need:
- 2 cups all-purpose flour
- 1 tablespoon baking powder
- 1 teaspoon salt
- 1/2 teaspoon garlic powder
- 1/2 teaspoon onion powder
- 1 cup dill pickle juice
- 1/4 cup vegetable oil
- 2 large eggs
- 1 cup chopped dill pickles
- 1 tablespoon fresh dill, chopped (or 1 teaspoon dried dill)
If you’re feeling adventurous, consider substituting the vegetable oil with olive oil for a richer flavor, or add a pinch of cayenne pepper for a little heat.
Instructions
- Preheat your oven to 350°F (175°C) and grease a 9×5-inch loaf pan.
- In a large bowl, whisk together the flour, baking powder, salt, garlic powder, and onion powder.
- In a separate bowl, combine the dill pickle juice, vegetable oil, and eggs. Whisk until well blended.
- Add the wet ingredients to the dry ingredients, stirring gently until just combined. Do not overmix.
- Fold in the chopped dill pickles and fresh dill. I like to add a little extra dill for that punch of flavor reminiscent of my abuela’s homemade salsas, where herbs reigned supreme.
- Pour the batter into the prepared loaf pan and smooth the top with a spatula.
- Bake for 45-50 minutes, or until a toothpick inserted into the center comes out clean. The aroma will transport you to culinary bliss, much like the scents wafting through our family kitchen on a Sunday afternoon.
- Allow the bread to cool in the pan for 10 minutes before transferring it to a wire rack to cool completely.
- Prep Time: 15 minutes
- Cook Time: 30 minutes
- Category: Main Dish
- Method: Cooking
- Cuisine: International
Steps to Create Your Dill Pickle Bread
- Preheat your oven to 350°F (175°C) and grease a 9×5-inch loaf pan.
- In a large bowl, whisk together the flour, baking powder, salt, garlic powder, and onion powder.
- In a separate bowl, combine the dill pickle juice, vegetable oil, and eggs. Whisk until well blended.
- Add the wet ingredients to the dry ingredients, stirring gently until just combined. Do not overmix.
- Fold in the chopped dill pickles and fresh dill. I like to add a little extra dill for that punch of flavor reminiscent of my abuela’s homemade salsas, where herbs reigned supreme.
- Pour the batter into the prepared loaf pan and smooth the top with a spatula.
- Bake for 45-50 minutes, or until a toothpick inserted into the center comes out clean. The aroma will transport you to culinary bliss, much like the scents wafting through our family kitchen on a Sunday afternoon.
- Allow the bread to cool in the pan for 10 minutes before transferring it to a wire rack to cool completely.
Tips for Making the Best Dill Pickle Bread
To ensure your Dill Pickle Bread turns out perfectly every time, keep these tips in mind:
First, always use fresh ingredients. The dill’s freshness, in particular, makes a world of difference. I learned this the hard way during one of my early experiments, but now it’s a non-negotiable for me.
Second, avoid overmixing your batter. Mixing too much can result in a dense bread, and we’re aiming for light and fluffy.
Lastly, if you’re a fan of cheese, consider adding a cup of shredded cheddar to the mix. It’s a delightful addition that brings a comforting richness, much like the cheesy dishes my family would prepare during holidays.
Serving Suggestions and Pairings

This Dill Pickle Bread is incredibly versatile. Serve it warm with a pat of butter or as a side to your favorite soup or stew. It pairs particularly well with creamy tomato soup or a hearty beef stew, offering a tangy contrast that elevates the meal.
For a fun twist, try using slices of Dill Pickle Bread as the base for a unique sandwich. Layer on some turkey, cheese, and a smear of mustard for an unforgettable lunch. It’s a nod to the creative sandwiches my siblings and I would concoct during lazy summer afternoons.
Storage and Reheating Tips
To keep your Dill Pickle Bread fresh, store it in an airtight container at room temperature for up to three days. For longer storage, wrap it tightly in plastic wrap and place it in the freezer for up to three months.
When you’re ready to enjoy a slice, simply reheat it in the oven at 350°F for about 10 minutes. If you’re in a hurry, a quick zap in the microwave will do, but be careful not to overheat, as it can make the bread tough.
Frequently Asked Questions
What are the main ingredients for Dill Pickle Bread?
The main ingredients for Dill Pickle Bread include the items listed in our ingredients section above. Each ingredient plays a crucial role in achieving the perfect flavor and texture.
How long does it take to make Dill Pickle Bread?
The total time to make Dill Pickle Bread includes both preparation and cooking time. Check the recipe card above for exact timing details.
Can I make Dill Pickle Bread ahead of time?
Yes, Dill Pickle Bread can often be prepared in advance. Store it properly in an airtight container in the refrigerator and consume within the recommended timeframe.
What can I serve with Dill Pickle Bread?
Dill Pickle Bread pairs well with various sides and accompaniments. Consider the serving suggestions mentioned in the recipe for the best dining experience.
Is Dill Pickle Bread suitable for special diets?
Depending on the ingredients used, Dill Pickle Bread may be adapted for various dietary needs. Check the ingredients list and consider substitutions as needed for your dietary requirements.
Final Thoughts
Dill Pickle Bread is more than just a recipe; it’s a culinary journey that brings together the joy of unexpected flavors with the warmth of home cooking. It’s a testament to the creativity and love that goes into every dish, much like the meals my family shared around our bustling Asheville table. I hope this recipe brings a bit of that same joy and creativity into your kitchen. Here’s to cooking with love, and creating memories one slice at a time. Happy cooking!

")