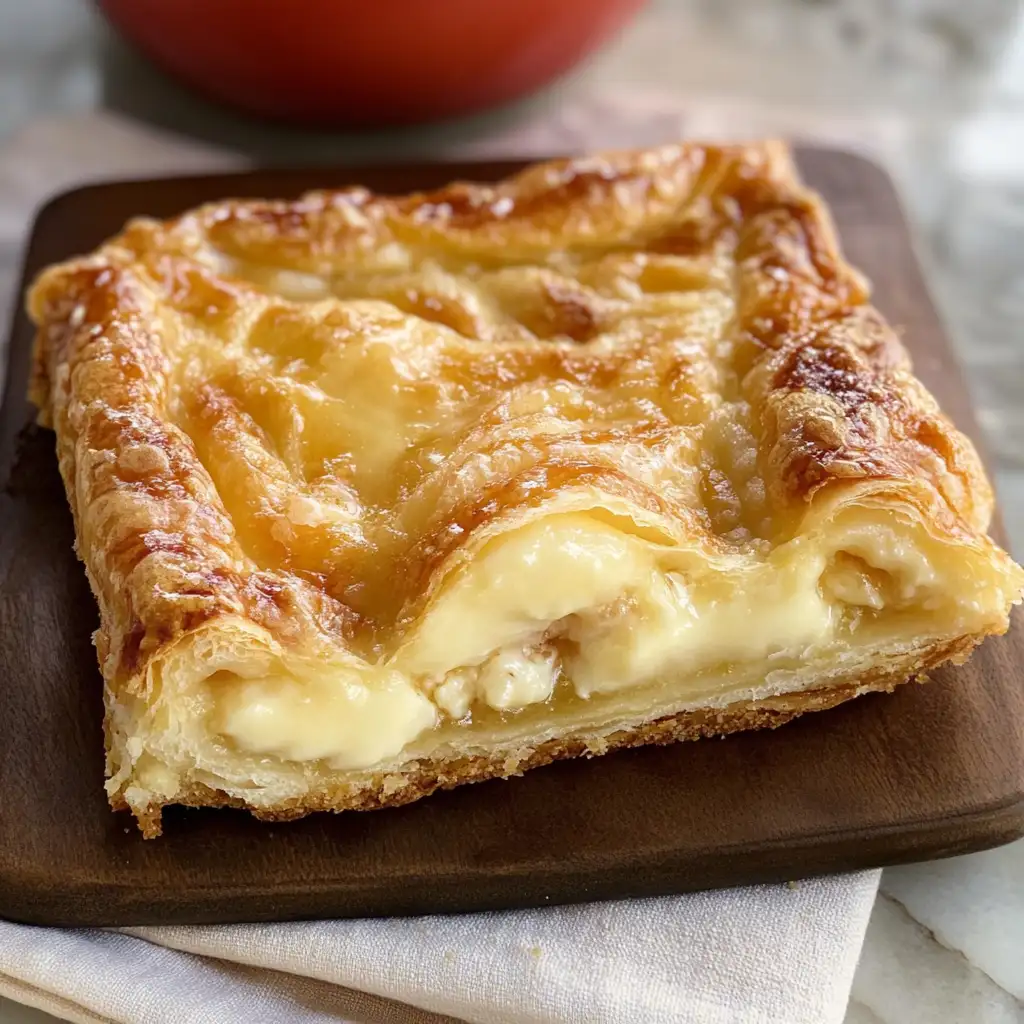
There’s something incredibly comforting about a Homemade Cheese Danish, isn’t there? Maybe it’s the flaky pastry, or the creamy, slightly tangy cheese filling that makes each bite feel like a warm hug. Growing up in a bustling Mexican-American household in Asheville, North Carolina, I learned early on that food has a way of bringing people together. This Cheese Danish recipe is a delightful reminder of those noisy family breakfasts, where my grandmother’s culinary magic filled the air with the aroma of fresh breads and pastries. Now, as I navigate life in Charleston with my husband Marco and our golden retriever Biscuit, I’ve embraced the joy of recreating those cherished moments in my own kitchen. Let me take you on a journey to create your own delicious Danish that will surely bring warmth and joy to your table.
Table of Contents
Why You’ll Love This Homemade Cheese Danish
What makes this Homemade Cheese Danish so special? It’s the blend of simplicity and indulgence that makes it a versatile treat for any time of the day. Whether you’re enjoying a leisurely breakfast or needing a comforting midday snack, this Danish fits the bill. It’s the same feeling I get when I bake a loaf of banana bread on a rainy day—comforting and fulfilling. The recipe combines the best elements of a flaky pastry with a luscious, creamy cheese filling, reminiscent of those family meals where food was not just sustenance, but an expression of love and tradition. You’ll find that this Danish not only satisfies your sweet cravings but also connects you with the comforting rituals of home cooking.
Ingredients You’ll Need for This Homemade Cheese Danish

To make a batch of delightful Homemade Cheese Danishes, gather the following ingredients:
- 2 sheets of puff pastry, thawed
- 8 ounces cream cheese, softened
- 1/2 cup granulated sugar
- 1 teaspoon vanilla extract
- 1 large egg yolk
- 1 tablespoon lemon juice
- 1 egg, beaten (for egg wash)
- Powdered sugar, for dusting
If you’re looking for substitutions, you might try using ricotta cheese in place of cream cheese for a lighter filling. And if you’re in the mood for a fruity twist, a spoonful of your favorite jam or fresh berries can be added on top of the cheese mixture before baking.
Nutrition Facts
Here’s a quick look at the nutrition facts for one serving of this delectable treat:
- Calories: 350 per serving
- Protein: 6g
- Fat: 22g
- Carbohydrates: 30g
- Fiber: 1g
- Sugar: 14g
- Sodium: 200mg
Remember, it’s all about balance. Enjoying a Homemade Cheese Danish as part of a varied diet can be a delightful indulgence. As I often say, food should feed both the body and the soul.
Print
Irresistibly Flaky: The Ultimate Homemade Cheese Danish Recipe
Learn how to make delicious Homemade Cheese Danish. Easy recipe with step-by-step instructions.
- Total Time: 45 minutes
- Yield: 4 servings
Ingredients
To make a batch of delightful Homemade Cheese Danishes, gather the following ingredients:
- 2 sheets of puff pastry, thawed
- 8 ounces cream cheese, softened
- 1/2 cup granulated sugar
- 1 teaspoon vanilla extract
- 1 large egg yolk
- 1 tablespoon lemon juice
- 1 egg, beaten (for egg wash)
- Powdered sugar, for dusting
If you’re looking for substitutions, you might try using ricotta cheese in place of cream cheese for a lighter filling. And if you’re in the mood for a fruity twist, a spoonful of your favorite jam or fresh berries can be added on top of the cheese mixture before baking.
Instructions
Follow these steps to create your own batch of delicious Homemade Cheese Danishes:
- Preheat your oven to 400°F (200°C) and line a baking sheet with parchment paper.
- In a medium bowl, combine the softened cream cheese, granulated sugar, vanilla extract, egg yolk, and lemon juice. Mix until smooth and creamy.
- Unroll the thawed puff pastry sheets and cut each into 4 squares. You should have a total of 8 squares.
- Spoon a generous tablespoon of the cheese mixture into the center of each square.
- Fold the corners of each square towards the center to form a Danish shape, gently pressing the corners to stick.
- Brush the edges of each Danish with the beaten egg to ensure a golden, flaky crust.
- Place the Danishes on the prepared baking sheet and bake for 18-20 minutes, or until they are puffed and golden brown.
- Allow them to cool slightly before dusting with powdered sugar.
My abuela often reminded me that baking is as much about intuition as it is about precision. If the Danishes look golden and smell heavenly, you’re on the right track!
- Prep Time: 15 minutes
- Cook Time: 30 minutes
- Category: Main Dish
- Method: Cooking
- Cuisine: International
Steps to Create Your Homemade Cheese Danish
Follow these steps to create your own batch of delicious Homemade Cheese Danishes:
- Preheat your oven to 400°F (200°C) and line a baking sheet with parchment paper.
- In a medium bowl, combine the softened cream cheese, granulated sugar, vanilla extract, egg yolk, and lemon juice. Mix until smooth and creamy.
- Unroll the thawed puff pastry sheets and cut each into 4 squares. You should have a total of 8 squares.
- Spoon a generous tablespoon of the cheese mixture into the center of each square.
- Fold the corners of each square towards the center to form a Danish shape, gently pressing the corners to stick.
- Brush the edges of each Danish with the beaten egg to ensure a golden, flaky crust.
- Place the Danishes on the prepared baking sheet and bake for 18-20 minutes, or until they are puffed and golden brown.
- Allow them to cool slightly before dusting with powdered sugar.
My abuela often reminded me that baking is as much about intuition as it is about precision. If the Danishes look golden and smell heavenly, you’re on the right track!
Tips for Making the Best Homemade Cheese Danish
Here are some tips to ensure your Homemade Cheese Danishes turn out perfect every time:
- Ensure your cream cheese is at room temperature for easy mixing.
- Don’t overfill the pastry; a little cheese mixture goes a long way.
- For an extra flaky crust, chill the assembled Danishes for 15 minutes in the fridge before baking.
- Experiment with flavors by adding a pinch of cinnamon or a drop of almond extract to the cheese mixture.
These little tweaks can add a personal touch to your Danishes, much like the way my grandmother would adjust her recipes to suit the season or occasion.
Serving Suggestions and Pairings

A Homemade Cheese Danish pairs beautifully with a steaming cup of coffee or a creamy latte. For a full breakfast spread, serve them alongside fresh fruit and yogurt. If you’re hosting brunch, a light salad with arugula and a citrus vinaigrette can complement the richness of the Danish. Just like the bustling, vibrant meals of my childhood, these Danishes can be the star of any gathering, inviting smiles and satisfied sighs from around the table.
Storage and Reheating Tips
To store your Homemade Cheese Danishes, place them in an airtight container in the refrigerator for up to three days. For longer storage, wrap them individually in plastic wrap and freeze for up to a month. To reheat, simply warm them in a 350°F (175°C) oven for 5-10 minutes until heated through. This way, you can enjoy freshly baked flavor even days after they were made. Remember, food is best when shared, but when you have leftovers, it’s wonderful to know you can extend the pleasure.
Frequently Asked Questions
What are the main ingredients for Homemade Cheese Danish?
The main ingredients for Homemade Cheese Danish include the items listed in our ingredients section above. Each ingredient plays a crucial role in achieving the perfect flavor and texture.
How long does it take to make Homemade Cheese Danish?
The total time to make Homemade Cheese Danish includes both preparation and cooking time. Check the recipe card above for exact timing details.
Can I make Homemade Cheese Danish ahead of time?
Yes, Homemade Cheese Danish can often be prepared in advance. Store it properly in an airtight container in the refrigerator and consume within the recommended timeframe.
What can I serve with Homemade Cheese Danish?
Homemade Cheese Danish pairs well with various sides and accompaniments. Consider the serving suggestions mentioned in the recipe for the best dining experience.
Is Homemade Cheese Danish suitable for special diets?
Depending on the ingredients used, Homemade Cheese Danish may be adapted for various dietary needs. Check the ingredients list and consider substitutions as needed for your dietary requirements.
Final Thoughts
Baking these Homemade Cheese Danishes is more than just preparing a treat—it’s about creating a moment of joy and connection. Whether it’s a quiet morning with a cup of tea or a bustling family brunch, they bring a sense of warmth and nostalgia that only true comfort food can offer. As you roll out the dough and mix the cheese, remember that cooking is an act of creativity and care, much like how my abuela taught me when I was just a child in Asheville. I hope this recipe brings as much happiness to your home as it does to mine. Happy baking, and may your kitchen be filled with love and laughter!


")