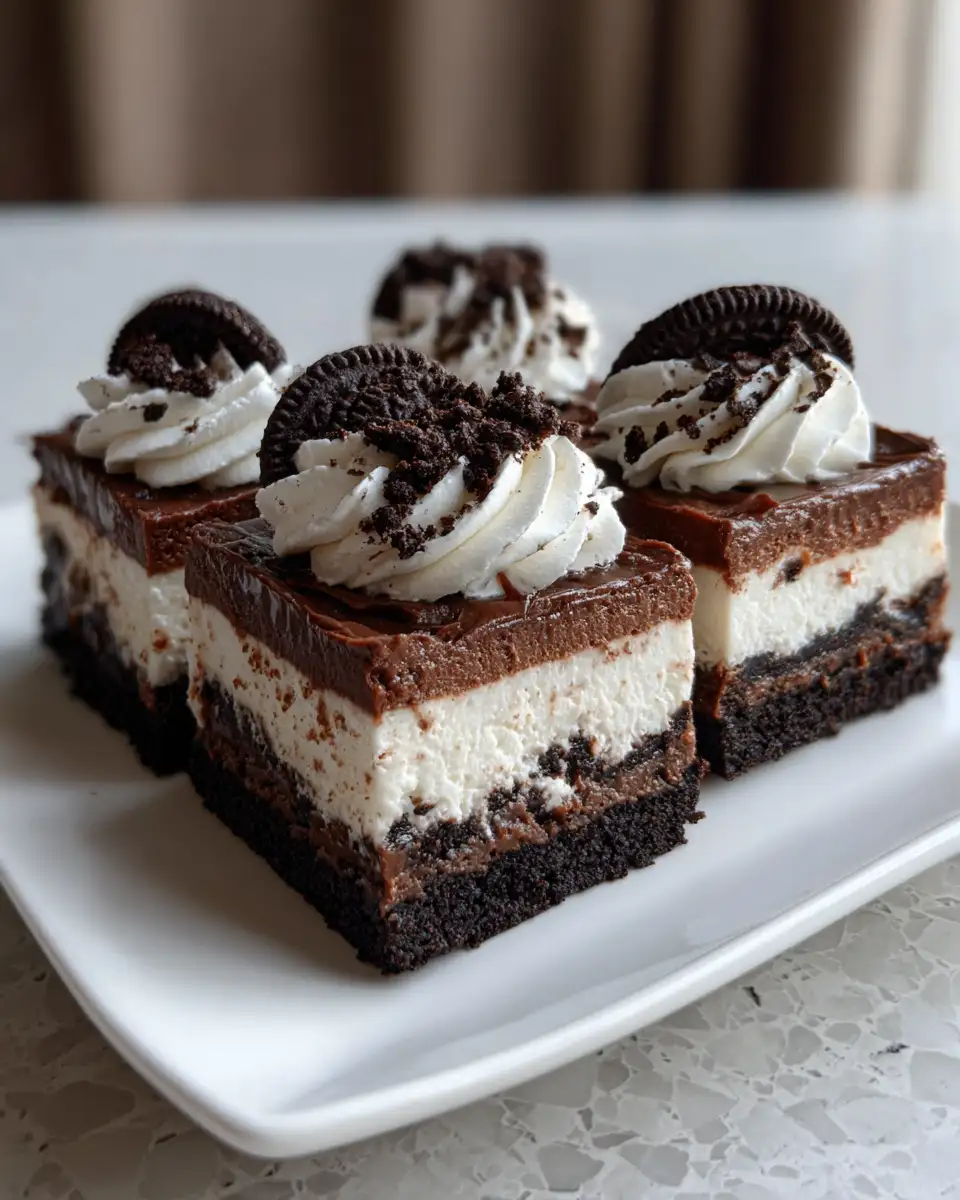
There’s something undeniably magical about a recipe that brings together the rich, comforting taste of Oreos with the creamy delight of cheesecake, all without needing to turn on the oven. That’s exactly what I love about these No-Bake Oreo Cheesecake Bars. They’re a sweet treat that embodies my cooking philosophy: simple, delicious, and filled with joy. Growing up in a bustling Mexican-American household in Asheville, North Carolina, I learned early on that the best recipes are those that bring people together with vibrant flavors and easy preparation. Now, living in Charleston, South Carolina, with my husband Marco and our golden retriever Biscuit, I continue to cherish those culinary traditions while exploring new ones. These cheesecake bars are a testament to that blend of nostalgia and adventure, and I can’t wait to share them with you!
Table of Contents
Why You’ll Love This No-Bake Oreo Cheesecake Bars
What makes these No-Bake Oreo Cheesecake Bars so irresistible? Well, for starters, they’re incredibly easy to make. As someone who believes cooking should be a joyful, stress-free endeavor, this recipe fits right in with my philosophy. You don’t need any fancy equipment or extensive baking experience to whip these up, making them perfect for busy weekdays or spontaneous dessert cravings. Plus, the combination of crunchy Oreo crust and silky cheesecake filling is a textural delight that’s bound to impress anyone you share them with. Whether you’re a seasoned home cook or just starting out, these bars offer a taste of indulgence with minimal effort.
Ingredients You’ll Need for This No-Bake Oreo Cheesecake Bars

- 24 Oreo cookies, crushed
- 5 tablespoons unsalted butter, melted
- 16 ounces cream cheese, softened
- 1 cup powdered sugar
- 1 teaspoon vanilla extract
- 1 cup heavy cream, whipped
- Additional Oreos for topping, optional
If you’re out of Oreos, you can substitute with any chocolate sandwich cookie. And if you prefer a less sweet option, try using reduced-sugar cream cheese.
Nutrition Facts
- Calories: 350 per serving
- Protein: 4g
- Fat: 23g
- Carbohydrates: 32g
- Fiber: 1g
- Sugar: 20g
- Sodium: 220mg
These bars are a treat, so enjoy them in moderation as part of a balanced diet.
Print
Irresistible No-Bake Oreo Cheesecake Bars: Your New Favorite Indulgence
Learn how to make delicious No-Bake Oreo Cheesecake Bars. Easy recipe with step-by-step instructions.
- Total Time: 45 minutes
- Yield: 4 servings
Ingredients
- 24 Oreo cookies, crushed
- 5 tablespoons unsalted butter, melted
- 16 ounces cream cheese, softened
- 1 cup powdered sugar
- 1 teaspoon vanilla extract
- 1 cup heavy cream, whipped
- Additional Oreos for topping, optional
If you’re out of Oreos, you can substitute with any chocolate sandwich cookie. And if you prefer a less sweet option, try using reduced-sugar cream cheese.
Instructions
- Start by preparing the crust. In a medium bowl, combine the crushed Oreo cookies with melted butter. Mix well until the crumbs are evenly coated.
- Press the mixture firmly into the bottom of an 8×8-inch baking dish lined with parchment paper. Place in the refrigerator while you prepare the filling.
- In a large bowl, beat the softened cream cheese with powdered sugar and vanilla extract until smooth and creamy.
- Gently fold in the whipped cream until well combined. Be careful not to deflate the mixture.
- Spread the cream cheese mixture over the chilled Oreo crust, smoothing the top with a spatula.
- Refrigerate the bars for at least 4 hours or until fully set.
- Before serving, top with additional crushed Oreos if desired. Cut into squares and enjoy!
Remember my abuela’s motto — trust your senses. You’ll know the mixture is just right when it tastes like a cloud of sweet, creamy goodness!
- Prep Time: 15 minutes
- Cook Time: 30 minutes
- Category: Main Dish
- Method: Cooking
- Cuisine: International
Steps to Create Your No-Bake Oreo Cheesecake Bars
- Start by preparing the crust. In a medium bowl, combine the crushed Oreo cookies with melted butter. Mix well until the crumbs are evenly coated.
- Press the mixture firmly into the bottom of an 8×8-inch baking dish lined with parchment paper. Place in the refrigerator while you prepare the filling.
- In a large bowl, beat the softened cream cheese with powdered sugar and vanilla extract until smooth and creamy.
- Gently fold in the whipped cream until well combined. Be careful not to deflate the mixture.
- Spread the cream cheese mixture over the chilled Oreo crust, smoothing the top with a spatula.
- Refrigerate the bars for at least 4 hours or until fully set.
- Before serving, top with additional crushed Oreos if desired. Cut into squares and enjoy!
Remember my abuela’s motto — trust your senses. You’ll know the mixture is just right when it tastes like a cloud of sweet, creamy goodness!
Tips for Making the Best No-Bake Oreo Cheesecake Bars
For a firmer crust, try adding an extra tablespoon of butter. If your crust feels too crumbly, this trick will help it hold together better. Also, make sure your cream cheese is at room temperature before mixing to avoid any lumps. A little patience here goes a long way, much like the patience I learned while rolling out tortillas with my abuela.
Serving Suggestions and Pairings

These bars are delicious on their own, but if you want to elevate the experience, serve them with a scoop of vanilla ice cream or a drizzle of chocolate sauce. Pair them with a cup of fresh-brewed coffee or a glass of cold milk for a delightful contrast. Just like our family meals back in Asheville, these bars are best enjoyed in good company.
Storage and Reheating Tips
Store any leftover bars in an airtight container in the refrigerator for up to 5 days. If you’d like to save them for a rainy day, you can freeze the bars for up to 2 months. Just wrap them individually in plastic wrap and place them in a freezer-safe bag. To enjoy, simply thaw in the refrigerator overnight.
Frequently Asked Questions
What are the main ingredients for No-Bake Oreo Cheesecake Bars?
The main ingredients for No-Bake Oreo Cheesecake Bars include the items listed in our ingredients section above. Each ingredient plays a crucial role in achieving the perfect flavor and texture.
How long does it take to make No-Bake Oreo Cheesecake Bars?
The total time to make No-Bake Oreo Cheesecake Bars includes both preparation and cooking time. Check the recipe card above for exact timing details.
Can I make No-Bake Oreo Cheesecake Bars ahead of time?
Yes, No-Bake Oreo Cheesecake Bars can often be prepared in advance. Store it properly in an airtight container in the refrigerator and consume within the recommended timeframe.
What can I serve with No-Bake Oreo Cheesecake Bars?
No-Bake Oreo Cheesecake Bars pairs well with various sides and accompaniments. Consider the serving suggestions mentioned in the recipe for the best dining experience.
Is No-Bake Oreo Cheesecake Bars suitable for special diets?
Depending on the ingredients used, No-Bake Oreo Cheesecake Bars may be adapted for various dietary needs. Check the ingredients list and consider substitutions as needed for your dietary requirements.
Final Thoughts
Making these No-Bake Oreo Cheesecake Bars is like taking a sweet trip down memory lane. They remind me of those carefree afternoons spent in the kitchen with my family, where every dish was a labor of love and creativity. I hope this recipe brings a bit of that magic to your home, offering a taste of comfort and joy. Whether you’re making them for yourself or sharing with loved ones, these bars are a delicious reminder that cooking, much like life, is best when shared. Happy cooking, and enjoy every bite!


")