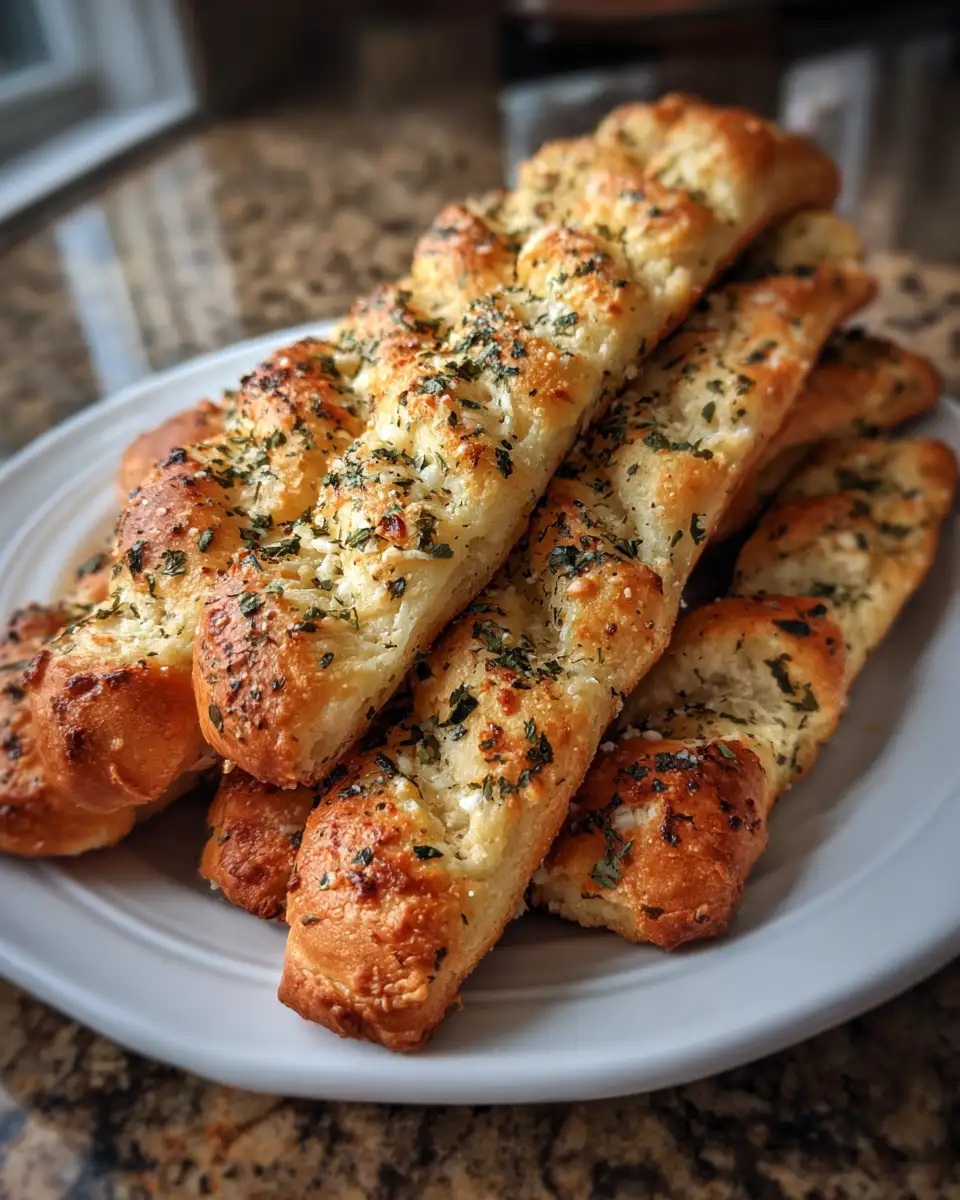
There’s something undeniably comforting about the scent of freshly baked bread wafting through your home. It instantly transports me back to childhood Sundays in Asheville, where my abuela would roll out batches of dough with a rhythm as familiar as her stories. Today, I’m excited to share a recipe that captures that warmth and nostalgia: Olive Garden Breadsticks. These breadsticks are more than just an appetizer; they are a gateway to cherished gatherings and simple pleasures, reminiscent of the bustling kitchen where my culinary journey began.
Table of Contents
Why You’ll Love This Olive Garden Breadsticks
Olive Garden Breadsticks are a classic favorite, beloved for their soft, buttery texture and irresistible garlic aroma. What makes this recipe special is its simplicity and the joy it brings to both novice and seasoned cooks alike. As someone who believes cooking should be an act of creativity and care, this recipe is a testament to that philosophy. It offers the chance to slow down, savor the process, and create something truly delightful. Whether you’re recreating a memory of dining out or introducing your family to this classic, these breadsticks are sure to become a staple in your kitchen.
Ingredients You’ll Need for This Olive Garden Breadsticks

- 1 cup warm water (110°F to 115°F)
- 1 package active dry yeast (2 1/4 teaspoons)
- 2 tablespoons granulated sugar
- 3 1/4 cups all-purpose flour
- 2 tablespoons unsalted butter, melted
- 1 teaspoon salt
- 1/4 cup unsalted butter, melted (for brushing)
- 1 teaspoon garlic powder
- 1 teaspoon dried Italian seasoning
- 1 tablespoon kosher salt (for sprinkling)
Feel free to substitute with whole wheat flour for a heartier texture or add a pinch of Parmesan cheese to the topping for extra flavor.
Nutrition Facts
- Calories: 140 per breadstick
- Protein: 3g
- Fat: 4g
- Carbohydrates: 23g
- Fiber: 1g
- Sugar: 1g
- Sodium: 180mg

Irresistible Olive Garden Breadsticks: The Secret to Soft, Savory Delight
Learn how to make delicious Olive Garden Breadsticks. Easy recipe with step-by-step instructions.
- Total Time: 45 minutes
- Yield: 4 servings
Ingredients
- 1 cup warm water (110°F to 115°F)
- 1 package active dry yeast (2 1/4 teaspoons)
- 2 tablespoons granulated sugar
- 3 1/4 cups all-purpose flour
- 2 tablespoons unsalted butter, melted
- 1 teaspoon salt
- 1/4 cup unsalted butter, melted (for brushing)
- 1 teaspoon garlic powder
- 1 teaspoon dried Italian seasoning
- 1 tablespoon kosher salt (for sprinkling)
Feel free to substitute with whole wheat flour for a heartier texture or add a pinch of Parmesan cheese to the topping for extra flavor.
Instructions
- In a large bowl, combine warm water, yeast, and sugar. Let it sit for about 5 minutes until the mixture becomes frothy, indicating the yeast is activated.
- Add the flour, 2 tablespoons of melted butter, and salt to the yeast mixture. Mix until a soft dough forms.
- Transfer the dough to a floured surface and knead for about 8-10 minutes until smooth and elastic. This step is therapeutic, much like rolling out tortillas with my grandmother.
- Place the dough in a greased bowl, cover with a damp cloth, and let it rise in a warm place for about 1 hour or until it doubles in size.
- Preheat your oven to 400°F. Once the dough has risen, punch it down and divide it into 12 equal pieces. Roll each piece into a 7-inch long breadstick and place them on a parchment-lined baking sheet.
- Cover the breadsticks with a cloth and let them rise for another 15 minutes.
- Bake the breadsticks for 12-14 minutes or until they are golden brown.
- While the breadsticks are baking, mix the remaining melted butter with garlic powder and Italian seasoning.
- Brush the hot breadsticks with the seasoned butter and sprinkle with kosher salt.
- Prep Time: 15 minutes
- Cook Time: 30 minutes
- Category: Main Dish
- Method: Cooking
- Cuisine: International
Steps to Create Your Olive Garden Breadsticks
- In a large bowl, combine warm water, yeast, and sugar. Let it sit for about 5 minutes until the mixture becomes frothy, indicating the yeast is activated.
- Add the flour, 2 tablespoons of melted butter, and salt to the yeast mixture. Mix until a soft dough forms.
- Transfer the dough to a floured surface and knead for about 8-10 minutes until smooth and elastic. This step is therapeutic, much like rolling out tortillas with my grandmother.
- Place the dough in a greased bowl, cover with a damp cloth, and let it rise in a warm place for about 1 hour or until it doubles in size.
- Preheat your oven to 400°F. Once the dough has risen, punch it down and divide it into 12 equal pieces. Roll each piece into a 7-inch long breadstick and place them on a parchment-lined baking sheet.
- Cover the breadsticks with a cloth and let them rise for another 15 minutes.
- Bake the breadsticks for 12-14 minutes or until they are golden brown.
- While the breadsticks are baking, mix the remaining melted butter with garlic powder and Italian seasoning.
- Brush the hot breadsticks with the seasoned butter and sprinkle with kosher salt.
Tips for Making the Best Olive Garden Breadsticks
Creating the perfect Olive Garden Breadsticks requires a few simple tricks. First, ensure your water is at the right temperature for activating the yeast. Too hot, and you’ll risk killing the yeast; too cold, and it won’t activate properly. Kneading the dough is crucial for developing gluten, which gives the breadsticks their chewy texture. As my abuela always said, “Feel the dough; it will tell you when it’s ready.” Lastly, don’t skip the seasoned butter — it’s what elevates these breadsticks from good to unforgettable.
Serving Suggestions and Pairings

These breadsticks pair beautifully with a wide range of dishes. Serve them alongside a hearty pasta like my creamy fettuccine Alfredo or as an accompaniment to a fresh garden salad. They’re also perfect for soaking up the rich flavors of a homemade soup, such as my personal favorite, roasted tomato basil. For a touch of nostalgia, enjoy them with a simple marinara dipping sauce, reminiscent of those family dinners where bread was a staple at the table.
Storage and Reheating Tips
To store any leftover breadsticks (if there are any!), wrap them in aluminum foil and keep them at room temperature for up to two days. For longer storage, place them in a freezer bag and freeze for up to a month. To reheat, wrap the breadsticks in foil and warm them in a 350°F oven for about 10 minutes. This method helps maintain their soft texture, making them taste just as fresh as the day you baked them.
Frequently Asked Questions
What are the main ingredients for Olive Garden Breadsticks?
The main ingredients for Olive Garden Breadsticks include the items listed in our ingredients section above. Each ingredient plays a crucial role in achieving the perfect flavor and texture.
How long does it take to make Olive Garden Breadsticks?
The total time to make Olive Garden Breadsticks includes both preparation and cooking time. Check the recipe card above for exact timing details.
Can I make Olive Garden Breadsticks ahead of time?
Yes, Olive Garden Breadsticks can often be prepared in advance. Store it properly in an airtight container in the refrigerator and consume within the recommended timeframe.
What can I serve with Olive Garden Breadsticks?
Olive Garden Breadsticks pairs well with various sides and accompaniments. Consider the serving suggestions mentioned in the recipe for the best dining experience.
Is Olive Garden Breadsticks suitable for special diets?
Depending on the ingredients used, Olive Garden Breadsticks may be adapted for various dietary needs. Check the ingredients list and consider substitutions as needed for your dietary requirements.
Final Thoughts
Making Olive Garden Breadsticks at home is more than a culinary exercise; it’s an opportunity to connect with tradition and create new memories. Every step, from kneading the dough to savoring that first bite, is infused with a sense of warmth and community — values passed down from my family to yours. I hope this recipe brings as much joy to your table as it has to mine. Remember, cooking is not just about feeding the body, but nurturing the soul. So, roll up your sleeves, have fun, and happy baking!

")